My company recently removed a Cisco IPS device (pile of crap) along with a Microsoft 2006 ISA Server (more of a pile of crap) from the network infrastructure. It cost too much to maintain licensing, and it was starting to become a huge headache for company growth.
However, the director of IT requested that we still have some sort of logging for potential breaches. Every firewall block in/out is sent to us via email, and every firewall action is kept in a syslog server (and backed up to another syslog server and NAS system), but it would be nice to see the packets and payloads of every network transaction.
Snort to the rescue! Snort is free (well, if you don’t mind having to setup/maintain/administer it without a ton of help and really don’t mind having slightly older rules than paying customers), and doesn’t really require a lot of hardware to get it to work. Our production Snort is running on an HP DL320 1U with a 3.2GHz Pentium 4, 2GB RAM, and a mirror of 80GB SATA. For testing I used VMWare Workstation 7, but I’m sure you can use VMWare Server/ESX/ESXi or Xenapp etc.
The settings I used for VMWare:
I named it SNORT
1 processor, 2 cores
512MB RAM
Bridged Networking single interface (eth0)
SCSI LSI Logic I/O
SCSI 20GB HD Partition Split into 2GB Files
Removed the Floppy Disk
I’m also using Ubuntu Server 10.04 LTS 32bit. Grab that ISO if you don’t already have it. Oh, and since some of my “readers” want me to put this: I grabbed the information used in this post from the ubuntuforums, from bil at play, and from Nick Moore.
I assume that you already know how to load Ubuntu Server. If not, then Snort will probably be a little bit over your head. http://linux.insanelan.com. Ubuntu was loaded with the following settings:
Language – English
Hostname – snortsvr
Time Zone – CDT
Partitioning method – Guided used entire disk
Full name for new user – buddy
Username for account – buddy
Password – buddy (I know it’s weak)
Encrypt home directory – no
Automatic Updates – no
I always install LAMP, Mail, and OpenSSH. Just a standard setup for me.
MySQL Root Password – password
Postfix configuration – internet site
System mail name – snortsvr.local
Load Grub to MBR – yes
Continue, and then it’ll reboot your system.
Login as buddy/buddy. Now I dislike the whole “sudo” crap. It’s my server, I don’t want to have to ask for permission to use it. If this is a shared server – sure go ahead – otherwise do the following:
sudo passwd root
Enter your buddy password
Enter your root password (I put in “password”)
su
Enter your root password
This is optional but I find it a lot easier to SSH via putty to my system than to control it via the VMWare interface.
ifconfig eth0
Make note of your IP address
Open Putty and SSH to your Server (in my case it’s 10.4.0.54)
Login as root
You’ll notice that there will be several packages to update. Update them.

apt-get update
apt-get upgrade
Depending on the speed of your internet connection, you may have time to watch a movie – or maybe it’s already done and you’re wondering why I typed this sentence. Either way, keep reading:
DOWNLOADS AND INSTALLATIONS
Install the following on your Ubuntu system:
apt-get install libpcap0.8-dev libmysqlclient15-dev bison flex apache2 php5 libapache2-mod-php5 php5-gd php5-mysql libtool libpcre3-dev php-pear
Make a directory for you to download stuff:
mkdir ~/snortfiles
cd ~/snortfiles
You’ll need to download the following:
Base 1.4.5
wget http://downloads.sourceforge.net/project/secureideas/BASE/base-1.4.5/base-1.4.5.tar.gz?use_mirror=voxel
ADOdb 4991
wget http://downloads.sourceforge.net/project/adodb/adodb-php-4-and-5/adodb-4991-for-php/adodb4991.tgz?use_mirror=voxel
Barnyard2 1.7
wget http://www.securixlive.com/download/barnyard2/barnyard2-1.7.tar.gz
Setup Snort
apt-get install snort-mysql
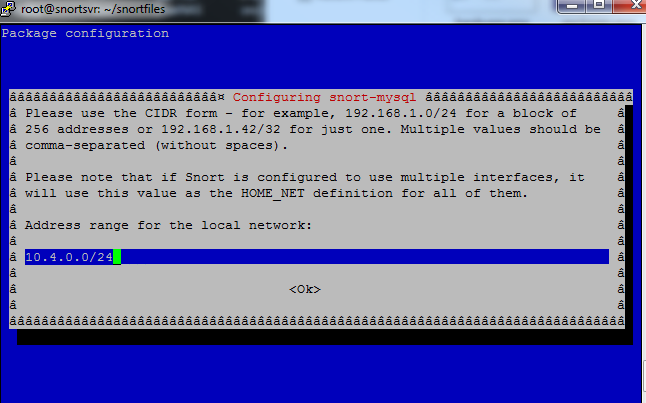
I used my local LAN (10.4.0.0/24)
Click OK
YES – you do want to setup a database for snort-mysql
Click OK

mysql -u root -p
My password is still password
create database snort;
grant CREATE, INSERT, SELECT, DELETE, UPDATE on snort.* to snort@localhost;
SET PASSWORD FOR snort@localhost=PASSWORD('yourpasswordhere');
exit
I used password once again for the password.
cd /usr/share/doc/snort-mysql/
Import the snort DB schema
zcat create_mysql.gz | mysql -u root -p snort
Verify that the import went well
mysql -u root -ppassword
SHOW DATABASES;
use snort;
SHOW TABLES;
You should see 16 rows in the set. If not, then you did something wrong.
exit
Edit snort.conf
nano /etc/snort/snort.conf
Find “var HOME_NET any”, and change it to “
var HOME_NET $eth0_ADDRESS”
Find “Output log_tcpdump: tcpdump.log” and change it to “#Output log_tcpdump: tcpdump.log”
Find “output log_unified” and insert “output unified2: filename snort.log, limit 128” below it.
save and exit
You’re now done installing snort!
Setting up BASE and ABOdb
pear install --alldeps Mail
pear install --alldeps Mail_Mime
pear install --alldeps Image_Canvas-0.3.2
pear install --alldeps Image_Graph-0.7.2
Navigate to your snortfiles folder
cd
cd snortfiles
tar -zxvf adodb4991.tgz
tar -zxvf base-1.4.5.tar.gz
mv adodb /var/www
mv base-1.4.5 /var/www
nano /etc/php5/apache2/php.ini
Find “Dynamic Extensions” and add the following to the end of that section:
extension=mysql.so
extension=gd.so
Find “error_reporting = E_ALL & ~E_DEPRECATED”
Replace witherror_reporting = E_ALL & ~E_NOTICE
save and exit
nano /etc/apache2/apache2.conf
Insert the following at the very bottom of the file: “servername snortsvr.local”
save and exit
apache2ctl restart
cd /var/www
ln -s base-1.4.5 ./base
chmod a+w base
Open up a web browser and navigate to http://IPADDRESSOFYOURSERVER/base
1.) Set the path to adodb to /var/www/adodb
2.) Database Name=snort
Database Host=localhost
Database User=snort,
Database Password=yourpassword
3.) check use authentication system
Admin User Name=snort
Password=yourpassword
Full Name=snort
4.) Click “Create BASE AG†and click on “step 5”
5.) Test your login and password and verify everything is working OK
chmod og-w base
Setting up Barnyard2
Find where you downloaded Barnyard2-1.7.tar.gz (Home directory anyone? cd ~)
tar -zxvf barnyard2-1.7.tar.gz
cd barnyard2-1.7
./configure --with-mysql && make && make install
cp etc/barnyard2.conf /etc/snort
mkdir /var/log/barnyard2
nano /etc/snort/barnyard2.conf
Find “#config hostname: thor” and change it to “config hostname: localhost”
Find “#config interface: eth0” and change it to “config interface: eth0”
Find “output database” and insert below that line “output database: alert, mysql, user=snort password=password dbname=snort host=localhost”
Save and exit
Starting Snort/Barnyard
snort -c /etc/snort/snort.conf -i eth0
If you see “Not Using PCAP_FRAMES” you’re doing OK!
Open up another Putty session and SSH to your server as root.
ls -la /var/log/snort
Look for a 10 digit suffix on snort.log. If you have more than one file with digits, look at the timestamp and grab the newest one!

nano /var/log/snort/barnyard.waldo
Paste in the following:
/var/log/snort
snort.log10DIGIT NUMBER FROM YOUR SNORT LOG STEP ABOVE
0
save and exit
Run this SINGLE LINE command:
/usr/local/bin/barnyard2 -c /etc/snort/barnyard2.conf -G /etc/snort/gen-msg.map -S /etc/snort/sid-msg.map -d /var/log/snort -f snort.log -w /var/log/snort/barnyard.waldo
Ping your server a few times. Then open up your browser to http://YOURSERVERIPADDRESS/base and see if anything shows up.
Auto Starting Snort
Control + C out of either Snort or Barnyard. Then reboot the server.
reboot
Log back into your server as root using SSH/Putty.
ps -A | grep snort
If nothing shows up (which nothing should), then continue on.
/etc/init.d/snort start

mv /etc/snort/db-pending-config /etc/snort/db-pending-config.orig
/etc/init.d/snort start

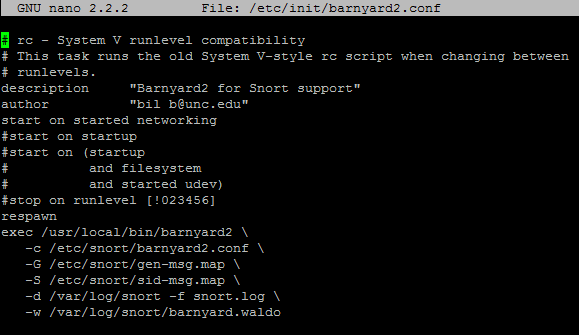
nano /etc/init/barnyard2.conf
# rc - System V runlevel compatibility
# This task runs the old System V-style rc script when changing between
# runlevels.
description "Barnyard2 for Snort support"
author "bil b@unc.edu"
start on started networking
#start on startup
#start on (startup
# and filesystem
# and started udev)
#stop on runlevel [!023456]
respawn
exec /usr/local/bin/barnyard2 \
-c /etc/snort/barnyard2.conf \
-G /etc/snort/gen-msg.map \
-S /etc/snort/sid-msg.map \
-d /var/log/snort -f snort.log \
-w /var/log/snort/barnyard.waldo
save and exit
reboot
Verify Everything Is Working
After your server reboots, log back into it via SSH as root.
ps -A | grep snort

ps -A | grep barnyard

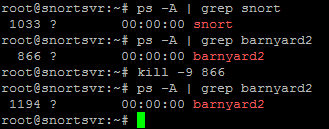
As long as you see the process ID and the name, you should be OK.  You can check that barnyard will auto restart by killing the process ID and then checking to see if it's running.  It should have a new ID afterwards.

***EDIT***
I found a much easier solution - install Snorby. Snorby is a pretty nice front-end for Snort. Barnyard is still utilized to take the load off of Snort.
You can grab the All In One solution (installs the OS, MySQL, Snort, Apache, Barnyard, Snorby, Etc) here:
http://bailey.st/blog/snorby-spsa/
Supposedly it auto updates once a day with Oinkmaster, but I haven't really gone through to verify yet. It'd be nice if some of the options were included in the GUI, but for free who am I to complain?


