Foobar2000 MSN Show Song Playing

I like software that just works. If it works well and uses minimal resources all the better. That’s why I like foobar 2000. I’m using it to play all of my songs and it’s using a slim 20MB. And yes, it works under Windows 7 64bit.

But one feature that was missing was the ability to show my fellow MSN (or Windows Live Messenger) users what I was currently listening to. Not that anyone cares, but it bothered me that both iTunes and Media Player could provide this information but foobar couldn’t.

There’s a plugin just for this reason – it works well under 0.9.6.9 so far.

Download this: http://it.thelibrarie.com/utilities/foo_msnalt.dll
Put the file in your foobar 2000 components folder (in my case it’s C:\Program Files (x86)\foobar2000\components)
Restart Foobar2000

You should now notice that MSN will display the song (assuming you set it to do so) in your status. Rock on.

Install Windows 7 or Vista via USB

I believe I already posted a how-to regarding installing Windows XP from a USB key flash drive thumb drive. Now we’re onto the next OS – Windows 7. This should work with Vista as well as they use the same boot loader. This will NOT work with XP.

You must have a USB Flash Drive of 4GB or more
You must have the Windows 7 or Vista installation files handy – OEM, Retail, or VL works ON CD OR ISO not just in a random folder
This process will ERASE your Flash drive, so make sure you don’t have anything on there you need to keep

Open the command prompt (Windows Key + R)
If you have any problems with the commands, try typing “cmd” into the Start Menu search box and then press Control + Shift + Enter to activate the admin privileged command prompt

Type diskpart
This will start the disk partition utility

list disk
This will show all of the disk’s currently in the disk management utility. In most cases Disk 1 will be your USB drive. MAKE SURE that this is the case BEFORE trying any of the following commands.
select disk 1
This selects the disk that you found from the previous command
clean
This clears out the partition tables
create partition primary
This creates a primary partition – primary is needed as a boot device
select partition 1
This selects the primary partition
active
This makes the primary partition active so it can be booted
format fs=ntfs
This formats the device with the filesystem NTFS. It took almost 30 minutes on a 16GB device
assign
This assigns all changes to the device
exit
Exits the utility

Keep the Command Window open though. We’ll be needing it again.

Now insert the CD or mount the ISO image. We need the 7 or Vista files to be mounted as a drive letter. Take note of the drive letter, in my case it’s G:
Also take note of the drive letter for your Flash Drive – in my case it’s F:

G: hit enter
cd boot hit enter
bootsect.exe /nt60 f: hit enter

Now copy all of the files from your DVD/ISO to the USB Flash Drive.

Once you’re done, reboot your machine and select the USB HD as your boot device.

That’s it!

DNS Name Does Not Exist

I was trying to activate Windows 7 on my desktop after I installed 7 and all of the required updates when I received this error:

DNS name does not exist.
0x8007232B

Yay! Turns out that I forgot to put the key in after I installed. Or, if I remember correctly, if you used vlite to auto input the key you will have to change the key to the same one and then reactivate.

So after changing the key, typing it in again, and then clicking activate, everything went smoothly.

BTW – Windows 7 is much faster than Vista SP2.

Outlook, Documents, Saving

I had a user receive an attached file in Outlook. The Excel spreadsheet was needed for budgeting or something important. The user opened the attached file, edited the file, and then clicked Save. The user then closed out of Excel.

This user needed to send the edited file back to the original source but could not locate said file. They said at their old job the file would automatically update in their outlook and they could just forward the original email back to the source and everyone would be happy. So I had the task of locating this important file.

Here’s where I looked:
Outlook 2003
C:\Documents and Settings\username\Local Settings\Temporary Internet Files\OLKRandomNumbers

Outlook 2007
C:\Documents and Settings\username\Local Settings\Temporary Internet Files\RandomNumbers

Vista/Windows 7
C:\Users\username\AppData\Local\Microsoft\Windows\Temporary Internet Files\Content.Outlook\xxxxxxxx

But I couldn’t find the documents in question. So I dug a little deeper and found if the user had edited the registry, they could point the temporary files toward another directory.
Outlook 2003
HKEY_CURRENT_USER\Software\Microsoft\Office\11.0\Outlook\Security

Value Name: OutlookSecureTempFolder
Data Type: REG_SZ
Outlook 2007
HKEY_CURRENT_USER\Software\Microsoft\Office\12.0\Outlook\Security

Value Name: OutlookSecureTempFolder
Data Type: REG_SZ

And thus I found the files, and all was great again!

You must enter a positive duration

I had a user who complained that he could not delete an item from his calendar on outlook 2007. He was actually trying to open the item on the calendar, but it provided the same results:

outlook_positive_duration

Cannot open this item. You must enter a positive duration.

What the hell does that mean? Basically the user somehow created a task that repeated from today through to the end of the world (infinity). Somehow it wouldn’t move, delete, open, or rename.

Being the network administrator that I am, I took ownership of his mailbox – well technically “Publishing Editor”, but we’ll assume ownership.

OK, I’m going to assume that you have already given yourself permissions to read the user’s mail/calendar by checking the Full Mailbox Access allow box in Active Directory AND have added the mailbox account to your outlook.

Click on Calendars
Check the box next to the Calendar in Mailbox – USERNAMEHERE
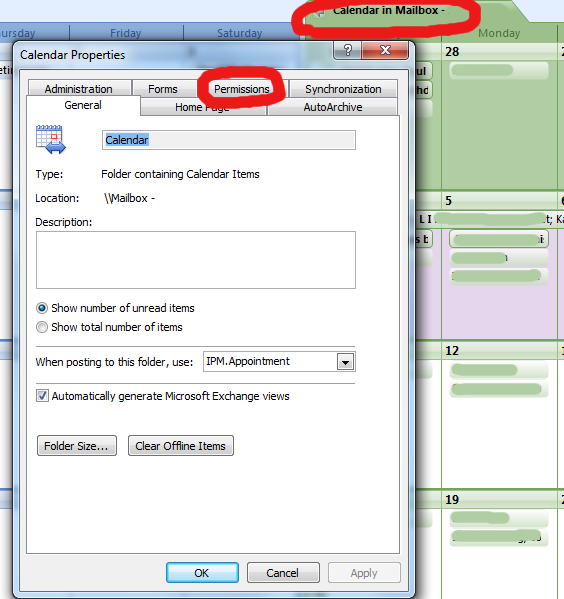
Right-click on the Calendar in Mailbox – USERNAMEHERE that shows up on the main screen and select properties
calendar_properties
Now click on the Permissions tab
Add your username to the list
Give your username Publishing Editor privileges

Now you can left-click once on the task and hit the magic Delete button. You may or may not still get an error about not being able to save the task, but it will surely go away.

Microsoft Dynamics GP 10 Mem_Bad_Pointer

A company is using Microsoft Dynamics GP 10 (Great Plains 10) for all of their financial recordings. They have a total of two people who input, print, and export data using MS Dynamics. It’s running SP3 FYI.

Each reports.dic file is running locally on the machine with a backup copy(ies) on a file server. Unfortunately after working well for almost a year, the report on one of the systems started to spew out errors. Researching the errors did not yield many results, so we went ahead and replaced the reports.dic file on the local machine. All errors then stopped.

Two weeks later BOTH machines are now having errors posting, running reports, etc. Looks like another corrupt reports.dic file. The error was:
Mem_Bad_Pointer
And then the program would close. Wonderful, right?

We tried to replace the file again, but the errors continued. So then we tried to import the existing file into a new reports.dic and use that. Yay!

Close out of Microsoft Dynamics GP 10
Navigate to your reports file (Default is c:\program files\microsoft dynamics\gp\reports.dic)
Rename the reports.dic file to reportsold.dic
Open Microsoft Dynamics GP 10 and log in as usual
Click on the User Preferences
Then Click on Tools > Customize > Report Writer
After the Report Writer loads, click on the Reports Button
Then Click on Import from file.

Now it gets a little tricky. You’ll have to select each and every field you want to import to the existing file (which is now the new reports.dic – a generic file created when you open GP for the first time). Highlight each field and then click the import button in the middle. When finished, click the Import button on the right hand side.

You should see all of your fields slowly (or quickly) go away. That’s a good sign – it means that all of those fields are now imported into the new reports.dic file.

We ended up keeping the reportsold.dic file just as a reference.

Helpful HTML

Meta refresh to another page or document.
Meta Refresh (meta-refresh) is used to reload a page as another. Basically, if someone navigates to http://it.thelibrarie.com they will be automatically forwarded to http://it.thelibrarie.com/weblog.
In the of your page insert the following:
<meta http-equiv="refresh" content="0;url=http://url">
The content=0 part is the amount of time before refreshing, given in seconds. So 0 means zero seconds (instantly) and 5 would be five seconds of waiting.

Setting up a link to mail someone, even with a subject already typed out.
Create a link basically like the following:
<a href="mailto:email_address@domain.tld?subject=some_subject">

Open link in new window or new tab.
I’d like to think that all sites have any external loading websites load in their own window. I don’t want to click on a link and have the original page disappear (especially my computer help site :D). I know anyone can middle click (wheel click) on a link and it will automatically open in a new tab/window, but sometimes people are just lazy.
Welcome “Target=” links:
<a href="http://www.google.com" target=_blank>Google</a>
Shows up as:
Google – Go ahead and click on that bad boy to see for yourselves.
Target can equal _blank, _self, or _top. _blank is for new tab/window, _self is for itself, and _top is for if/when you use frames and want it to show up in a specific spot framed off. You can also make up your own variables as long as they’re declared in the framing html code.

Writing HTML Code In Blogs.
This probably affects me more than you, but I’ll put it here anyway
&lt;
Shows this: <
&gt;
Shows this: >
If you need any more of the special characters, you can always use This Site.

Playing with text.
Sometimes you just need an extra space or two between words. Other times you need the text to look the exact same as what you wrote. Welcome PRE and NBSP!
This is what NORMAL text looks like

This is what PRE text looks like

This is what NORMAL text looks like with several spaces

   This  is      what  PRE    text  looks  like          with several  spaces

Notice that the text will not wrap – all formatting is ignored with the PRE text.

This is what amp;nbsp looks like:
 Test
Two of them:
  Test
Three:
   Test
Ten:
          Test

Hope you find all this as interesting as I do. I may or may not keep adding on as I find myself using the same commands over and over.

Ramblings Of An IT Person