ARP Address Security

ARP, or Address Resolution Protocol, is the primary method for your computer to talk with other network devices. Basically, your computer has an IP address (192.168.1.100) and wants to talk with your email server (192.168.1.101). Your computer will send out an ARP request for the owner of 192.168.1.101. A message will come back saying that 192.168.1.101 has a MAC address of xx-xx-xx-xx-xx-x1. That’s basically how they communicate. It obviously gets a lot more tedious when you add gateways, routers, and switches to the mix. Then add internet devices too with different masks. Oh man!

But there is a problem – broadcast addresses are always the last available IP in a subnet (in our example it’d be 192.168.1.255 with a mac address of FF:FF:FF:FF:FF:FF). Gateway addresses are always the first available IP in the subnet (once again, 192.168.1.1). If someone wanted to poison the ARP cache, they could easily point to the gateway address and spoof everyone else on the network to believe that they’re the gateway.

Computer: Hi everyone, I’m looking for the gateway
Poison: I’M THE GATEWAY!!!
Computer2: Hi everyone, I’m looking…
Poison: I’M THE GATEWAY!!!
Computer2: … for the gateway
Poison: I’M THE GATEWAY!!!

You can see why the poisoning of ARP can actually work. The poison programs will flood the network with broadcasts saying I’M THE GATEWAY!!!

So, how do you protect against this? The easiest way is to push a startup script to all your machines that deletes the current ARP and puts a static route in for your gateway. The only problem with this approach is if you ever change gateways or switches – the MAC address you enter as the static ARP will no longer be valid, and the routing for internet will cease.

Windows 2000/XP/Vista:

Start -> Run -> CMD
arp -d
arp -s 192.168.1.1 00-18-00-18-00-18

-d is for delete
-s is for static
obviously put your own gateway IP address in there and MAC address. If you need to find it, you can type arp -a and locate the MAC address associated with your gateway.

Vista requires elevated privs to run the arp commands. Right click on your command prompt and that will help with many of the problems.

Vista may require the following:

netsh -c “interface ipv4”
set neighbors “Local Area Connection” “192.168.1.1” “00-18-00-18-00-18”

Then check to make sure with:

arp -a
Unable To Activate Windows

Microsoft keeps making it more difficult to pirate their software, but at a cost: it’s harder for the average user (or corporate one) to activate legitimate software. I’m not a big fan of paying for software when you can find something similar for free, but sometimes you just have to bite the bullet.

After installing Vista Enterprise X64 on a laptop and Server 2008 on a workstation, I had some issues getting Windows to activate. Something about DNS issues. Ok, I can deal with that – I change the DNS entries to use 4.2.2.2 instead of my gateway (4.2.2.2 is a main ATT backbone DNS server that you *should* always be able to access and ping). It didn’t work – same issues.

So then I started reading a bit on the Technet site. Apparently there’s two ways to fix this issue:
1.) Install a KMS server (Key Management Server)
2.) Convert your key to a MAK (Multiple Activation Key)

Since it’s infinitely easier to convert the key when I’m only running a handful of systems, I chose the second option. Here’s what to do:
Open an administrative command (run as administrator) window.
Then type this code:
slmgr -ipk xxxxx-xxxxx-xxxxx-xxxxx-xxxxx
Then a window will pop up with either a positive or negative on the key change.

Ubuntu Command Line Change IP Settings

I find myself forgetting more and more when I use tools like webmin. These usually work with most flavors of linux as well.

sudo nano /etc/networking/interfaces

auto eth0
iface eth0 inet static
address 192.168.3.90
gateway 192.168.3.1
netmask 255.255.255.0
network 192.168.3.0
broadcast 192.168.3.255

Then restart the networking devices
sudo /etc/init.d/networking restart

*** EDIT 10/4/2017 ***
Almost a decade later and I had to update this slightly.

List Your Available Network Devices
ifconfig -a

List Your Currently Enabled/Working Network Devices
ifconfig

Edit Your Network Device
nano /etc/network/interfaces

auto ens32
iface ens32 inet static
address 192.168.3.90
gateway 192.168.3.1
netmask 255.255.255.0
network 192.168.3.0
broadcast 192.168.3.255
dns-nameservers 192.168.3.2 192.168.3.3
dns-search domainname.local

Restart Your Network Device
ifdown ens32 && ifup ens32

*** EDIT 1/12/2018 ***
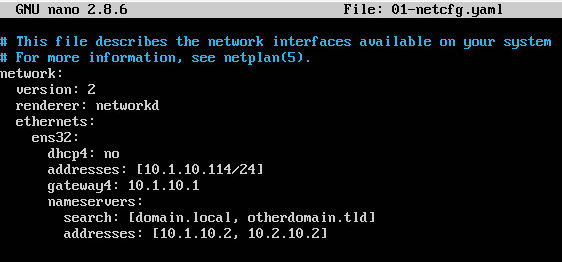
Only a few months later, but Ubuntu started using netplan instead of the usual ifup/ifconfig commands I’m used to. Now it’s yaml.
This is for 17.10 and later! Proper space is NEEDED to work.


nano /etc/netplan/01-netcfg.yaml

network:
version: 2
renderer: networkd
ethernets:
ens32:
dhcp4: no
addresses: [10.1.10.114/24,’IPV6HEREIFYOUWANT’]
gateway4: 10.1.10.1
nameservers:
search: [domain.local, otherdomain.tld]
addresses: [10.1.10.2, 10.2.10.2]

netplan apply

*** EDIT 2022-12-02 ***

Apparently this changed in Ubuntu 20.04 (although it still supported the “old way”), but in 22.04 I could not get netplan to support my use of the gateway4 option.

I’ve left the old style commented out, but the new way of using only routes for this purpose works well and opens up the idea of multiple gateways or static routes from a single system.

WordPress and Stats Pages

I have this issue from time to time – wordpress updates will break my stats pages. A simple edit in the .htaccess file clears this up.


RewriteEngine On
RewriteBase /
RewriteCond %{REQUEST_URI} ^/(stats|failed_auth\.html).*$ [NC]
RewriteRule . - [L]

# BEGIN WordPress

RewriteEngine On
RewriteBase /
RewriteCond %{REQUEST_FILENAME} !-f
RewriteCond %{REQUEST_FILENAME} !-d
RewriteRule . /index.php [L]

# END WordPress

Images Not Showing In Outlook 2007

We’ve had a couple people that, for whatever reason, have computers that don’t like to play along with the rest of the gang. The primary complaint is that images do not load in the email (mostly screen shots). They will, however, show up when the user attempts to Forward said email.

In 2007, click on New Email to open Word
Click that Giant ugly Microsoft Button on the top left of the window (called the “Office Button”)
Select Editor Options
Click on Advanced
Under Display Email Content, find the Show Picture Placeholders
Uncheck Show Picture Placeholders
Click OK
You may have to restart word/outlook for this setting to stick

Create or Delete a Service in Windows

Not growing up on Windows, I had no idea how to do this. So here it is for all those other people that don’t know how:

1.) Start, Run, regedit
2.) Navigate to HKLM\SYSTEM\CurrentControlSet\Services
3.) Find your service and you can remove it (Delete the whole key folder)

-OR-

if you don’t like messing with the registry (who really does?), then there’s a built-in command to remove and add services:
1.) Start, Run, cmd
2.) sc delete [service name], or sc create [service name]

Either way, you must reboot the system for the changes to take effect.

Vista Printer Support

When Vista was first released, I was one of the first people to say I’d never upgrade to something slower, bulkier, and overall completely different from what I was currently using (XP Pro). But since I work in the industry, I should probably know the answers to questions people have regarding Vista.

So Vista here I go! I installed Vista Enterprise SP1 64bit on my work machine (2.0GHz E2180, 5.5GB DDR2 800). Everything has been working actually much better than I thought – there are a decent amount of Vista drivers (although 64bit support is a little smaller). One issue I came across was the addition of printers.

I’m assuming you can find the Vista drivers on your own. If you have any problems, let me know and I’ll see what I can do.

After that, we will want to add the drivers onto the print server. We do this by using a Vista machine with administrative privileges (domain admin account works wonders).

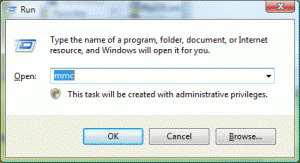
Start by running the MMC (Microsoft Management Console)

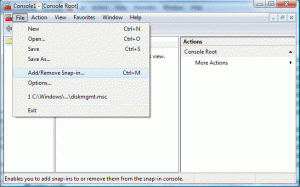
Then Click on File, Add Remove Snap In

Now select Print Management, and Click Add

A window will pop open. This is where we select the print server we use (you can always browse to the server name if you can’t remember). Then click add to list to add the printer below.

Now click Finish. That will close the print configuration window and you’ll be back on the MMC. You can click OK now. You should see Console Root, Print Management. Click once on the Print Management word to expand the listing.

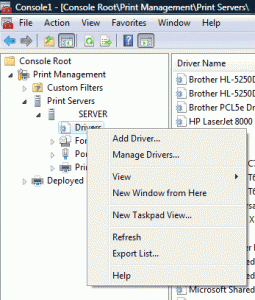
Expand Print Servers, then your PrintServerName, and right click on Drivers. Select Add Driver…

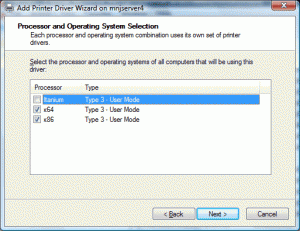
Follow along in the Wizard to add a print driver. If you’re importing a 64bit driver (like I have to do), then make sure to select x64 instead of x86.

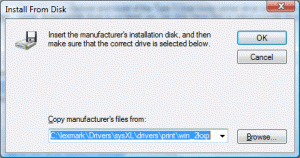
Click Have Disk… and then browse to your files (the installer should have extracted the required ini files for your system to a folder of your choosing – in our case it’s C:\lexmark\drivers…)

If prompted, select your correct printer from the list.

You can then verify the install went smoothly (when there are no errors), by clicking on the Drivers folder and searching for the driver you installed. In my case it’s anything with a x64 as the environment type.

Ramblings Of An IT Person