Secure Your Linux Box

Here are just a few small tricks to use to secure your linux based machines.

Disable Direct SSH Access For Root – Hackers must break or know TWO passwords to damage your system
1. SSH into your machine as root
2. cd /etc/ssh
3. nano /sshd_config
4. Under Authentication change PermitRootLogin to “no”
5. service sshd restart (Ubuntu is sudo /etc/init.d/ssh restart)

Slow Down SSH Attempts – This slows down attempts to no more than 3 per minute
1. SSH into your machine and su to root
2. iptables -I INPUT -p tcp –dport 22 -i eth0 -m state –state NEW -m recent –set
3. iptables -I INPUT -p tcp –dport 22 -i eth0 -m state –state NEW -m recent –update –seconds 60 –hitcount 4 -j DROP
4. iptables-save
5. iptables restart

[UPDATE 01.28.2008]
This requires a new(er) kernel with built-in support for the “recent” tag
1. SSH into your machine and su to root
2. iptables -N SSH_CHECK (this will create a new chain to lable all incoming SSH connections as SSH_CHECK)
3. iptables -A INPUT -p tcp –dport 22 -m state –state NEW -j SSH_CHECK (Checks the connection state port 22)
4. iptables -A SSH_CHECK -m recent –set –name SSH (labels the session type as SSH)
5. iptables -A SSH_CHECK -m recent –update –seconds 60 –hitcount 4 –name SSH -j DROP (Drops the connection if the hit counter reaches 4 in 60 seconds)

And then in Ubuntu
6. nano /etc/network/interfaces
7. After your eth0 or other network connection, add pre-up iptables-restore /etc/iptables.rules and post-down iptables-restore /etc/iptables.rules

[UPDATE 05.05.2009]
Running on Debian 5 this one works:
iptables -I INPUT -p tcp --dport 22 -i eth0 -m state --state NEW -m recent --set
iptables -I INPUT -p tcp --dport 22 -i eth0 -m state --state NEW -m recent --update --seconds 60 --hitcount 3 -j DROP

[UPDATE 01.06.2010]
Running on Ubuntu 9.10 this works:
iptables -I INPUT -p tcp --dport 22 -i eth0 -m state --state NEW -m recent --set
iptables -I INPUT -p tcp --dport 22 -i eth0 -m state --state NEW -m recent --update --seconds 240 --hitcount 3 -j DROP

This only allows 3 connection attempts (or successes) for every 6 minutes. Since my box is a small one that doesn’t require a lot of logins, I’d probably go even higher than this. Too high, though, and you could be locked out of your own box by others.

If you were to reboot your machine right now, your iptables configuration would disappear. Rather than type this each time you reboot, however, you can save the configuration, and have it start up automatically. To save the configuration, you can use iptables-save and iptables-restore.

[UPDATE 02.15.2010]
You can also limit based on username and IP address:

Limit based on Username:
nano /etc/ssh/sshd_config

PermitRootLogin no
AllowUsers userA userB@localhost userC@IPaddress

Limit based on IP address:
nano /etc/hosts.allow

sshd : localhost
sshd : 127.0.0.1
sshd : 192.168.0.0/24
sshd : localhost 127.0.0.1 192.168.1.* 172.16.34.253

nano /etc/hosts.deny

sshd : all

[UPDATE 08.31.2010]
You should probably make sure that your phpmyadmin and webmin installations are secured as well. It’s not hard to check the logs and see that there are many bots trying to gain access to these two installations – even if you don’t have them installed/configured on your box. Damn bots…

nano /etc/apache2/conf.d/phpmyadmin.conf

Obviously add your own IP’s into the config file. Then save the file and exit. Then restart apache.
apache2ctl restart

hal.dll Is Missing

I’ve had this issue almost as many times as I’ve had the NTLDR issue. So I decided to be a great guy and explain how I fix(ed) it.

Here’s the error: Windows could not start because the following file is missing or corrupt: \system32\hal.dll. Please re-install a copy of the above file.

1.) Boot off your Windows XP Disk
2.) If you require a HD driver (if you use SATA for example) make sure you have a floppy of the SATA drivers handy – you will need it.
3.) After the setup finishes loading, press R for repair.
4.) A recovery console will appear, select the installation of Windows you want to repair (usually C:\Windows)
5.) Type in your administrator password. In most cases this is actually blank.
6.) Type BootCfg /Rebuild (this will take a while, select the option ALL).
7.) You will have to select a few options here if you have more than one Windows bootable drive. ALL usually works just fine.
8.) Enter Load Identifier shows up. Type in something you’ll remember (I usually type TESTing)
9.) Enter Operating System Load Options shows up. Type /fastdetect

10.) Type exit. You should be done.

Installing NANO instead of PICO

This is a Linux type issue, so if you use Windows you need not read. I love having simple text editors. Who likes knowing how to exit out of VI or how to get the menus to work on emacs? And who has even heard of, let alone used, ee?

I grew up on PICO. Pico comes with most basic installations of Linux because it’s packaged with PINE (the email client). Pico gets the job done whenever I’ve needed it. I like using EE more, but it’s also harder to find on every system (FreeBSD is great). Enough buzz words? OK, on to the meat of the article.

Since no one likes to install extra software (you need to install PINE in order to get PICO on a system), I found a program called NANO. Here’s the simple steps to get it to install:

Oh, be warned that it requires at least a simple C+ compiler (oops).

Open up a terminal session.
type “wget http://www.nano-editor.org/dist/v1.2/nano-1.2.5.tar.gz” without the quotes
cd to the directory you downloaded the tar.gz to.
type “gtar xvvzf nano-1.2.5.tar.gz” without the quotes.
cd into the nano-1.2.5 directory.
type “./configure” without the quotes – this will tell you if there are any problems before compiling the program.
type “make install” without the quotes – this will actually install the required files into sbin and usr directories.
after the installation is finished, you can type “nano” or “nano {filename}” and run this very simple text editor.

Windows XP Hidden Files Boot.ini

Working in an IT environment, I find myself needing to make a lot of visual basic (.vbs) and batch files (.bat). Windows XP, in it’s infinite wisdom, defaults to hide the file name extensions that I need to change. Here’s a simple diagram on how to view these file extensions.

main window

Here you’ll see that I tried to make a batch file (.bat), but it’s still just a text file. Windows naming is then “batchfile.bat.txt”. In order for this file to run as a batch file, it needs to be “batchfile.bat”.

folder options

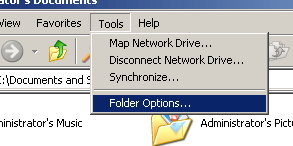
In any Windows explorer window, click on “Tools” and select “Folder Options…”

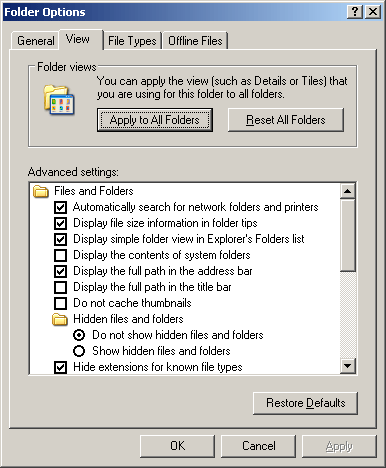
Then you’ll see this window:

folder options window

If you uncheck “Hide extensions for known file types” you will be able to see .doc, .bat, .txt, .html, .rtf and the like.

If you select “Show hidden files and folders” you’ll be able to see most of the hidden Windows folders and files throughout the system.

If you uncheck “Hide protected operating system files (Recommended)” you will be able to see the boot.ini file and edit it as well.

NTLDR is missing

NTLDR is missing Press any key to restart.

Quite possibly since the first time Windows 2000 came out, this error has shown it’s ugly face many times. Finding information using google, I came across a fair number of sites that offered advice. Trying out some of them (even using windows crafty boot disks) I find that the easiest answer is found by using the Microsoft Windows disk itself.

Instead of making various ISO’s, burning CD’s, creating floppies etc, just throw in the Windows CD. In this case I’m going to be using a Dell OEM copy of Windows XP Pro SP2. It shouldn’t matter what copy you use, it’ll fix just the same.

Step 1: Boot off the CD. If you don’t know how to boot off the CD, you can search google for the answer.
Step 2: After everything is loaded, the installer should recognize that you have a Windows OS already installed. If it doesn’t, then check the cable connections to your HD. If those are fine, get a new HD – yours is fried.
Step 3: Choose Repair. This will bring up a black screen with some white text.
Step 4: Select your Windows installation – usually there is only one, it’ll tell you C:\Windows or D:\Windows etc, with a number next to it. Select the number and hit enter.
Step 5: Type FIXBOOT then enter
Step 6: Type Y, hit enter
Step 7: Type CD \, hit enter
Step 8: Type COPY D:\I386\NTLDR C:\, hit enter
Step 9: Type COPY D:\I386\NTDETECT.COM C:\, hit enter
Step 10: Type ATTRIB -H -S -R NTLDR, hit enter
Step 11: Type ATTRIB -H -S -R NTDETECT.COM, hit enter
Step 12: Reboot.

This should fix it right up. NTLDR errors are usually caused by a corrupted BOOT.INI file, and these steps will help recreate a working boot file.

Running more than one copy of Gaim

Since I’m a computer geek I usually have multiple AIM names on at the same time. Some I don’t even use anymore, they just sit online and twiddle their thumbs in the air while singing Incubus songs. But anyway, I’ve been using AdiumX (Macintosh) and Gaim since, well, a long time now. Adium since pre-alpha days, and Gaim before it was even ported to Windows.

Well, after finally getting rid of Windows 2000 Pro SP4 and installing a fresh copy of Windows XP Pro SP2 right over top, I found myself wondering how come I couldn’t open more than one copy of gaim.

Gaim Instance Error

I don’t like being limited, especially when it comes to computers and especially especially when I was not limited before. It’s like they don’t want me to use their product to it’s full potential. Obviously I had to find a way to fix this situation.

Follow these easy steps. This works with Windows XP Pro, Windows XP Home, and Windows 2000 Pro.

1.) Click “Start” and right click My Computer (Or if you’re My Computer icon is on the desktop you can do it there – OR you can hit Windows Key + Pause Break)
2.) Click on the “Advanced” tab

3.) Click on the “Environment Variables” button

4.) Under “User Variables for ” click on the “New” button.

5.) In the first box type “GAIM_MULTI_INST” and in the second box type “C:\Program Files\Gaim\gaim.exe”

6.) Hit “OK” a couple of times and you’re done. Now try opening another GAIM client.

Gaim Instance 2
Obviously if you installed Gaim into a different directory you must point to the gaim.exe where you installed it. Easy huh?

If you have a neat trick and want to share, just e-mail me the information. Thanks!

EDIT 08042008
This one really hasn’t been an issue as of the GAIM to Pidgin name change. You can have as many buddies signed in under a single application as you want now.

Ramblings Of An IT Person