Category Archives: Linux

The Linux Category actually encompasses *BSD, RH, Fedora, Ubuntu, and the like.

Redirect Websites

Redirect websites using Apache web server!

On the server itself, you can edit the virtualhosts page:
nano /etc/apache2/sites-enabled/000-default

<VirtualHost *:80>
ServerName callmanager
ServerAlias *callmanager
ServerAlias callmanager*
Redirect permanent / https://iocm1/
</VirtualHost>

Or on the webpage itself:

<html>
<head>
<meta http-equiv=”Refresh” Content=”0; URL=http://redirecturl/dir/dir2/”>
</head>
<body>
Link to new page if browser does not support the redirection
</body>
</html>

http://www.yolinux.com/TUTORIALS/ApacheRedirect.html

Asus O!Play HDP-R1

I purchased an OPlay about a year ago. It’s been great – uses less power than my former HTPC AND the wife likes the ability to navigate via remote only better than my keyboard/mouse/remote combo from before. She (and I) misses the XBMC interface though. That interface is MUCH better than the ASUS one. But who can complain about 14 watts of power and the size of the unit?

So why the post? I was having problems playing Bluray ISO rips. DVD ISO’s played just fine. Bluray m2ts files played just fine. Bluray ISOs would skip quite a bit in terms of the video – audio was always working via the HDMI connection. The odd part was the same files would play just fine over the external USB powered Hard Drive without skipping.

Hardware:
2.5GHz Pentium Dual-Core
1024MB DDR2 PC6400
4X 1.5TB 5400RPM SATA in RAID5 (about 4.2TB usable)
FreeNAS 0.7.1
Gigabit Layer 3 switch

I had set the freenas settings as follows:
Send/Receive buffers were set to 65535
Large read/write was set to on
MTU was set to 9216 (jumbo frames)

Still it was skipping. Since it didn’t happen on the external drive, I assumed that the network was to blame. After a little bit of research I found out that Samba is not nearly as awesome as NFS.

So, turn on NFS on your freenas:

Path of /mnt/raid/Multimedia with Network of 192.168.1.0/24 in my case

Then, telnet to your OPlay and make a few minor settings:

Open Putty
Telnet to the OPlay
Login as “root”
mkdir -p /tmp/ramfs/volumes/core
mount -t nfs -o intr,nfsvers=3,rsize=32768,wsize=32768,hard,udp,nolock 192.168.1.234:/mnt/raid/Multimedia /tmp/ramfs/volumes/core

If you get an error, you did something wrong. Obviously change the IP:/directories to be that of your environment.

If it works, move onto making this a startup script.

cp /usr/local/etc/rcS rcS.old
vi /usr/local/etc/rcS
Scroll down to the end of the file, then press “i”
#Mount NFS
mkdir -p /tmp/ramfs/volumes/core
sleep 15
mount -t nfs -o intr,nfsvers=3,rsize=32768,wsize=32768,hard,udp,nolock 192.168.1.234:/mnt/raid/Multimedia /tmp/ramfs/volumes/core
Press “esc”
Type “:wq” and then hit enter

You should now see your NFS share on your OPlay’s local disk area! Yay!
AND no more skipping issues! YESSSS

I’m running firmware 1.28 NTSC.

Testing RAID and HD Speeds under *nix

I was given the task of purchasing a NAS/SAN solution for a secondary (dev) oracle database (11g). Pricing it out on the normal branded websites yielded roughly $12,000 to $30,000 depending on the options. A quick look at newegg gave me a lot more for less coin.

H55 Intel board, i3 2.93GHz dual core, 2GB DDR3 1333 dual channel, 6x 2TB 7200RPM SATA HDs in hot swapable cages, 4U case, Redundant 500Watt PSU, 8x RAID controller (SAS/SATA), Intel 10/100/1000. $2250. We could technically buy 5 of these for the lowest price of a branded system. But would it be fast enough?

Linux has this command for finding disk speeds:
/sbin/hdparm -t /dev/yourHDhere
And on my test system, here are the results:

Timing buffered disk reads: 202 MB in 3.01 seconds = 67.16 MB/sec

You can find out the path of the HD you want by:
df -h

That’s on a pretty decent VMWare box. On a real box, with much lower specs, the read times were abysmal:

Timing buffered disk reads: 10 MB in 3.32 seconds = 3.01 MB/sec

I guess IDE HD’s on P4 1.8GHz systems are not the best…
To find out your processor information:
cat /proc/cpuinfo

So how about on my NAS/SAN solution? Unfortunately the command /sbin/hdparm will not work as the OS on this machine is FreeBSD. However, there is a similar command for BSD:
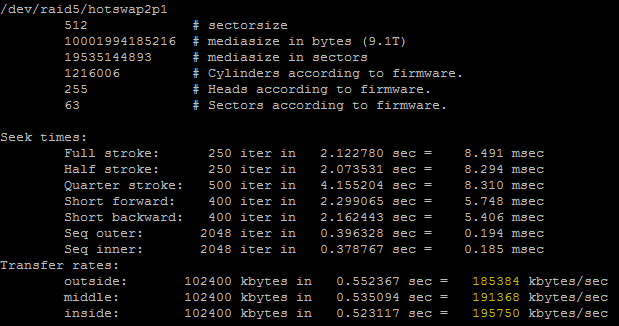
diskinfo -t /dev/yourHDhere

So you can see that the average for software RAID5 is 190834KB/sec (186.36MB/sec). That’s pretty stellar.

Next I’ll be trying RAID5 on the hardware card, followed by RAID10 on that same card. I’ll post the results as soon as I can.

***EDIT***

RAID5 on an Areca ARC-1222
466.74MB/sec using the exact same hardware setup. Next will be trying RAID1+0.

RAID10 is actually slower. It’s showing 319.70MB/sec. I’m going to try with the following commands from /mnt/raidcontainer:
dd if=/dev/zero of=testfile bs=1M count=5000
and
dd if=/dev/zero of=testfile bs=8K count=5000
to see what is up.

254MB/sec on 1MB writes over 5000 attempts. I’m trying to find out how to not cache disk copies on the smaller file – it gave me over 1000MB/sec… 🙂

***EDIT again***
OK, so FreeBSD doesn’t allow for the oflag on dd, so we have to use conv=sparse instead (and I changed to 50000):
dd if=/dev/zero of=testfile bs=8K count=50000 conv=sparse
Which gives me 265MB/sec using 8K files. Not a bad idea of the range. I think that I must go back to HW RAID5 for a complete list of read and writes.

***EDIT 4***
I built another FreeNAS system (0.7.2.5543 x64) with the following specs:
H55 Intel board, i3 3.06GHz dual core, 4GB DDR3 1333 dual channel, 8x 2TB 7200RPM SATA HDs in hot swapable cages, 4U case, Redundant 658Watt PSU, 8x RAID controller (areca arc-1222) with battery backup cache, Intel 10/100/1000, dummy gig switch with jumbo frame support. $2800.
dd if=/dev/zero of=testfile bs=8K count=500000 conv=sparse

340MB/sec! Although the older rig averaged 44MB/sec per drive, this one is at 42.5MB/sec per drive. After this I think the primary issue will be the raid controller as a bottleneck.

VSFTP SSL and Filezilla

FTP Server needed to be secure (at least SSL 128) and was running on Ubuntu 10.04.1 x32. FTP client was required to be platform independent but needed to be tested on Windows 7 and Windows XP. I decided to use Filezilla for various reasons.

The easiest step was setting up the FTP server on the Ubuntu box. I followed along a bit on “Mike’s” blog (http://beginlinux.com/blog/2009/10/ubuntu-9-10-secure-ftp-with-ssl/). I was logged in as root to avoid all those sudo’s.

Update the system and install VSFTPD:
apt-get update
apt-get upgrade
apt-get install vsftpd

Edit the VSDTPD configuration:
nano /etc/vsftpd.conf

# Example config file /etc/vsftpd.conf
## Base Configuration
listen=YES
#listen_ipv6=YES
#anonymous_enable=YES
local_enable=YES
write_enable=YES
#local_umask=022
#anon_upload_enable=YES
#anon_mkdir_write_enable=YES
dirmessage_enable=YES
use_localtime=YES
xferlog_enable=YES
connect_from_port_20=YES

## Permissions
#chown_uploads=YES
#chown_username=whoever
chroot_local_user=YES
chroot_list_enable=NO
secure_chroot_dir=/var/run/vsftpd/empty
pam_service_name=vsftpd

## SSL Certificate Configuration
#implicit_ssl=YES
ssl_enable=YES
rsa_cert_file=/etc/ssl/certs/vsftpd.pem
rsa_private_key_file=/etc/ssl/certs/vsftpd.pem
allow_anon_ssl=NO
ssl_tlsv1=YES
#ssl_sslv2=YES
ssl_ciphers=HIGH
ssl_sslv3=YES
require_ssl_reuse=NO

## Force encrypted login/passwords
force_local_data_ssl=YES
force_local_logins_ssl=YES
listen_port=990
force_dot_files=NO
tcp_wrappers=NO
#listen_address=
#hide_file=
#anon_max_rate=
#local_max_rate=
pasv_min_port=6000
pasv_max_port=6500
#pasv_address=IPOFSERVER

Save and exit.

Create the self-signed SSL certificate. I’m assuming you’re like me and don’t have a budget for miscellaneous SSL certificates.
openssl req -x509 -nodes -days 730 -newkey rsa:2048 -keyout /etc/ssl/certs/vsftpd.pem -out /etc/ssl/certs/vsftpd.pem
Enter your information when prompted.

Restart the VSFTPD server:
/etc/init.d/vsftpd restart

Open ports on your firewall/router/gateway. Obviously change these to whatever you require and have in your conf file.
TCP 20-21 (data and login)
TCP 6000-6500 (PASV ports)

Connect using FileZilla:
Using the SiteManager (quick connect won’t work in this case), enter in the following:
Host - your IP address of the server (you can use the local IP for testing functionality of the server, but use the public IP for testing the firewall rules)
Port - 990
Server type - FTPES (FTP over explicit TLS/SSL)
Logon Type - Normal
User - username on the system
Password - password for that user
Click connect! Everything should work.

PS, this was done on a fresh install of ubuntu with SSH and LAMP installed.

***EDIT***
I was looking through the logs (/var/log/vsftpd.log) and watching connections:
watch cat /var/log/vsftpd.log
When I noticed the following:

No SSL session reuse on data channel

I added “require_ssl_reuse=NO” to the vsconfig

nano /etc/vsftp.conf
require_ssl_reuse=NO
Save and exit
/etc/init.d/vsftpd restart

Now I’m getting:

Connection terminated without SSL shutdown – buggy client?

If you’re receiving complaints that some cannot perform a directory listing, or you dislike having the following errors in your logs:
Server sent passive reply with unroutable address. Using server address instead.
GnuTLS error -53: Error in the push function.
Add the following to your NAT’d device (ie firewall/router):
nano /etc/vsftpd.conf
pasv_address=IPADDRESSOFYOUREXTERNALNAT
Save and restart the vsftp server
/etc/init.d/vsftpd restart

Edited to include pasv issue, remove sslv2, change the cert to 2048bit and valid for 2 years.

Decode eval gzinflate base64_decode

I had to install a wordpress theme for a customer. I’m not a web developer by any means, so lucky for me wordpress is pretty straight forward. The theme they wanted to use was “free”, but had a footer with links to the theme’s developer site. Unfortunately the developer’s site was no longer functioning. A brief search for their company yielded similar results – all landing website pages or 404 error sites.

The terms and conditions for the theme stated that you could remove the footer only if you paid $29.95 to the company. As there was no company to pay, a “gray area” was presented. Should I just remove the footer and be done with my day? The customer requested that I adhere to the terms and conditions but make sure that the links would not go to unknown websites for fear that a malicious link could be used. They also requested that an RSS feed link be removed from the footer.

I go to edit the footer and notice the following PHP code:
gzinflate(base64_decode('bVJRa9swEH4P5D9cTTrZEKdjG3tYbIeydexlfUhgMMYQtnWxRWTJk+RkWcl/n2S7bUirB+t8p/u+u+9ulSWM76EUuTFp8FUpizrIphNw52Uk5lI+x89PkkOtcZsGyaqtWyiE+qrjcqpBoY97RTgsSLWGVBY94zh3bvIp5qWQAlluBabDe$
Well how do I know this obfuscated PHP script isn’t going to send customers to malicious sites? I need to see the decoded PHP!

Scripting to the rescue!

Easiest way is to have a linux server laying around. I have a fully patched 10.04LTS Ubuntu server just for this purpose (VMWare Server).

Make the following PHP file:

< ? php /* Taken from http://www.php.net/manual/de/function.eval.php#59862 Directions: 1. Save this snippet as decrypt.php 2. Save encoded PHP code in coded.txt 3. Create a blank file called decoded.txt (from shell do CHMOD 0666 decoded.txt) 4. Execute this script (visit decrypt.php in a web browser or do php decrypt.php in the shell) 5. Open decoded.txt, the PHP should be decrypted */ echo "\nDECODE nested eval(gzinflate()) by DEBO Jurgen \n\n";
echo "1. Reading coded.txt\n";
$fp1 = fopen ("coded.txt", "r");
$contents = fread ($fp1, filesize ("coded.txt"));
fclose($fp1);
echo "2. Decoding\n";
while (preg_match("/eval\(gzinflate/",$contents)) {
$contents=preg_replace("/< \?|\?>/", "", $contents); eval(preg_replace("/eval/", "\$contents=", $contents)); } echo "3. Writing decoded.txt\n"; $fp2 = fopen("decoded.txt","w"); fwrite($fp2, trim($contents)); fclose($fp2);
?>

Then follow the directions in the script. Or, if you’re like me, just create the following:
coded.txt (this file will have the ENTIRE PHP portion – everything from “eval(gzinflate” to the last “);”)
decoded.txt (make sure it’s writeable – either 0666 or 0777)
Run the script
Open the decoded.txt file

OpenVPN, Mac OSX, Static Routes

Companies usually use Windows machines on a Windows network – everything is pretty much the same flavor of Windows, and all updates are forced upon the users. It’s actually very easy to maintain a Windows environment, provided the company allows the IT department to lock everything down on the end users.

Ah, but I had a new challenge today – get a Macintosh OSX 10.6.3 (now 10.6.4) to connect to the VPN and gain access to all of the network resources.

The company is using an OpenVPN solution – which means the choices for connecting are a lot nicer.

Download Tunnelblick for Mac OS X
http://code.google.com/p/tunnelblick
At the time of this writing, they’re on version 3.0 stable and 3.1.06 beta. I’m using the stable version.
Install Tunnelblick by double clicking on the DMG file and then double clicking on the Tunnelblick.app file
Press the Install button
Launch Tunnelblick
Use your LOCAL credentials to install
Create and open configuration folder
Move your filename.ovpn and your certificate.pem/crt file (/Users/username/Library/Application Support/Tunnelblick/Configurations)
Launch the Tunnelblick program – it should show up next to the time in the apple menu bar
Now you can click on the icon and select the VPN you want to connect to

Ah, but you want static routes too? OK.

Roark Holz gave me this snippet to use (I edited a bit):
Login as root (or sudo in front of all of these commands)
cd /Library/StartupItems
mkdir AddRoutes
cd AddRoutes
nano AddRoutes

#!/bin/sh
. /etc/rc.common
StartService ()
{
ConsoleMessage “Adding Static Routing Tables”
route add -net 10.1.0.0 -netmask 255.255.255.0 10.50.0.254
}
StopService ()
{
return 0
}
RestartService ()
{
return 0
}
RunService “$1”

nano StartupParameters.plist

{
Description = “Add static routing tables”;
Provides = (“AddRoutes”);
Requires = (“Network”);
OrderPreference = “None”;
}

chmod 755 AddRoutes StartupParameters.plist
reboot

After rebooting, check the route tables with:
netstat -r

Obviously 10.1.0.0 is the network, the netmask will be any variation of your netmask on the network, and the final IP is the gateway.

***EDIT***
OK, so I found out that since the TAP network is not enabled until AFTER booting and starting Tunnelblick… I had to edit the .ovpn file to include the following:
--route 10.1.0.0 255.255.255.0 10.50.0.254
--route 10.2.0.0 255.255.255.0 10.50.0.254
ETC. Works like a charm now.

Installing SNORT on Ubuntu 10.04

My company recently removed a Cisco IPS device (pile of crap) along with a Microsoft 2006 ISA Server (more of a pile of crap) from the network infrastructure. It cost too much to maintain licensing, and it was starting to become a huge headache for company growth.

However, the director of IT requested that we still have some sort of logging for potential breaches. Every firewall block in/out is sent to us via email, and every firewall action is kept in a syslog server (and backed up to another syslog server and NAS system), but it would be nice to see the packets and payloads of every network transaction.

Snort to the rescue! Snort is free (well, if you don’t mind having to setup/maintain/administer it without a ton of help and really don’t mind having slightly older rules than paying customers), and doesn’t really require a lot of hardware to get it to work. Our production Snort is running on an HP DL320 1U with a 3.2GHz Pentium 4, 2GB RAM, and a mirror of 80GB SATA. For testing I used VMWare Workstation 7, but I’m sure you can use VMWare Server/ESX/ESXi or Xenapp etc.

The settings I used for VMWare:

I named it SNORT
1 processor, 2 cores
512MB RAM
Bridged Networking single interface (eth0)
SCSI LSI Logic I/O
SCSI 20GB HD Partition Split into 2GB Files
Removed the Floppy Disk

I’m also using Ubuntu Server 10.04 LTS 32bit. Grab that ISO if you don’t already have it. Oh, and since some of my “readers” want me to put this: I grabbed the information used in this post from the ubuntuforums, from bil at play, and from Nick Moore.

I assume that you already know how to load Ubuntu Server. If not, then Snort will probably be a little bit over your head. http://linux.insanelan.com. Ubuntu was loaded with the following settings:

Language – English
Hostname – snortsvr
Time Zone – CDT
Partitioning method – Guided used entire disk
Full name for new user – buddy
Username for account – buddy
Password – buddy (I know it’s weak)
Encrypt home directory – no
Automatic Updates – no

I always install LAMP, Mail, and OpenSSH. Just a standard setup for me.

MySQL Root Password – password
Postfix configuration – internet site
System mail name – snortsvr.local
Load Grub to MBR – yes
Continue, and then it’ll reboot your system.

Login as buddy/buddy. Now I dislike the whole “sudo” crap. It’s my server, I don’t want to have to ask for permission to use it. If this is a shared server – sure go ahead – otherwise do the following:
sudo passwd root
Enter your buddy password
Enter your root password (I put in “password”)
su
Enter your root password

This is optional but I find it a lot easier to SSH via putty to my system than to control it via the VMWare interface.
ifconfig eth0
Make note of your IP address
Open Putty and SSH to your Server (in my case it’s 10.4.0.54)
Login as root

You’ll notice that there will be several packages to update. Update them.

apt-get update
apt-get upgrade

Depending on the speed of your internet connection, you may have time to watch a movie – or maybe it’s already done and you’re wondering why I typed this sentence. Either way, keep reading:

DOWNLOADS AND INSTALLATIONS
Install the following on your Ubuntu system:
apt-get install libpcap0.8-dev libmysqlclient15-dev bison flex apache2 php5 libapache2-mod-php5 php5-gd php5-mysql libtool libpcre3-dev php-pear

Make a directory for you to download stuff:
mkdir ~/snortfiles
cd ~/snortfiles

You’ll need to download the following:
Base 1.4.5
wget http://downloads.sourceforge.net/project/secureideas/BASE/base-1.4.5/base-1.4.5.tar.gz?use_mirror=voxel

ADOdb 4991
wget http://downloads.sourceforge.net/project/adodb/adodb-php-4-and-5/adodb-4991-for-php/adodb4991.tgz?use_mirror=voxel

Barnyard2 1.7
wget http://www.securixlive.com/download/barnyard2/barnyard2-1.7.tar.gz

Setup Snort
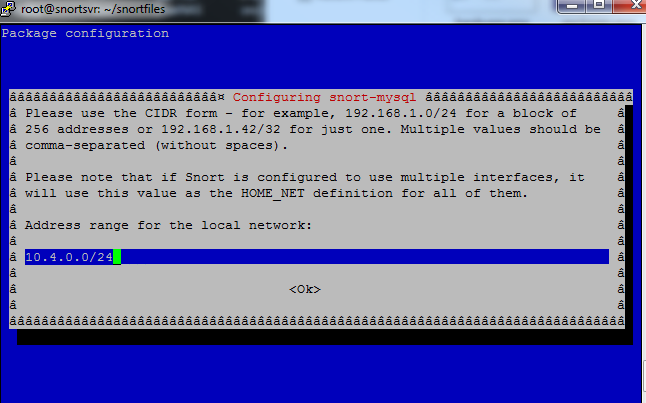
apt-get install snort-mysql
I used my local LAN (10.4.0.0/24)
Click OK
YES – you do want to setup a database for snort-mysql
Click OK
mysql -u root -p
My password is still password

create database snort;
grant CREATE, INSERT, SELECT, DELETE, UPDATE on snort.* to snort@localhost;
SET PASSWORD FOR snort@localhost=PASSWORD('yourpasswordhere');
exit
I used password once again for the password.

cd /usr/share/doc/snort-mysql/
Import the snort DB schema
zcat create_mysql.gz | mysql -u root -p snort

Verify that the import went well
mysql -u root -ppassword
SHOW DATABASES;
use snort;
SHOW TABLES;
You should see 16 rows in the set. If not, then you did something wrong.
exit

Edit snort.conf

nano /etc/snort/snort.conf

Find “var HOME_NET any”, and change it to “var HOME_NET $eth0_ADDRESS
Find “Output log_tcpdump: tcpdump.log” and change it to “#Output log_tcpdump: tcpdump.log
Find “output log_unified” and insert “output unified2: filename snort.log, limit 128” below it.
save and exit

You’re now done installing snort!

Setting up BASE and ABOdb
pear install --alldeps Mail
pear install --alldeps Mail_Mime
pear install --alldeps Image_Canvas-0.3.2
pear install --alldeps Image_Graph-0.7.2

Navigate to your snortfiles folder
cd
cd snortfiles
tar -zxvf adodb4991.tgz
tar -zxvf base-1.4.5.tar.gz
mv adodb /var/www
mv base-1.4.5 /var/www

nano /etc/php5/apache2/php.ini

Find “Dynamic Extensions” and add the following to the end of that section:
extension=mysql.so
extension=gd.so
Find “error_reporting = E_ALL & ~E_DEPRECATED”
Replace with error_reporting = E_ALL & ~E_NOTICE
save and exit

nano /etc/apache2/apache2.conf
Insert the following at the very bottom of the file: “servername snortsvr.local
save and exit

apache2ctl restart

cd /var/www
ln -s base-1.4.5 ./base
chmod a+w base

Open up a web browser and navigate to http://IPADDRESSOFYOURSERVER/base

1.) Set the path to adodb to /var/www/adodb
2.) Database Name=snort
Database Host=localhost
Database User=snort,
Database Password=yourpassword
3.) check use authentication system
Admin User Name=snort
Password=yourpassword
Full Name=snort
4.) Click “Create BASE AG” and click on “step 5”
5.) Test your login and password and verify everything is working OK

chmod og-w base

Setting up Barnyard2

Find where you downloaded Barnyard2-1.7.tar.gz (Home directory anyone? cd ~)

tar -zxvf barnyard2-1.7.tar.gz
cd barnyard2-1.7
./configure --with-mysql && make && make install
cp etc/barnyard2.conf /etc/snort
mkdir /var/log/barnyard2

nano /etc/snort/barnyard2.conf
Find “#config hostname: thor” and change it to “config hostname: localhost
Find “#config interface: eth0” and change it to “config interface: eth0
Find “output database” and insert below that line “output database: alert, mysql, user=snort password=password dbname=snort host=localhost
Save and exit

Starting Snort/Barnyard
snort -c /etc/snort/snort.conf -i eth0
If you see “Not Using PCAP_FRAMES” you’re doing OK!

Open up another Putty session and SSH to your server as root.
ls -la /var/log/snort
Look for a 10 digit suffix on snort.log. If you have more than one file with digits, look at the timestamp and grab the newest one!

nano /var/log/snort/barnyard.waldo
Paste in the following:

/var/log/snort
snort.log10DIGIT NUMBER FROM YOUR SNORT LOG STEP ABOVE
0

save and exit

Run this SINGLE LINE command:
/usr/local/bin/barnyard2 -c /etc/snort/barnyard2.conf -G /etc/snort/gen-msg.map -S /etc/snort/sid-msg.map -d /var/log/snort -f snort.log -w /var/log/snort/barnyard.waldo

Ping your server a few times. Then open up your browser to http://YOURSERVERIPADDRESS/base and see if anything shows up.

Auto Starting Snort
Control + C out of either Snort or Barnyard. Then reboot the server.
reboot

Log back into your server as root using SSH/Putty.
ps -A | grep snort
If nothing shows up (which nothing should), then continue on.
/etc/init.d/snort start

mv /etc/snort/db-pending-config /etc/snort/db-pending-config.orig
/etc/init.d/snort start

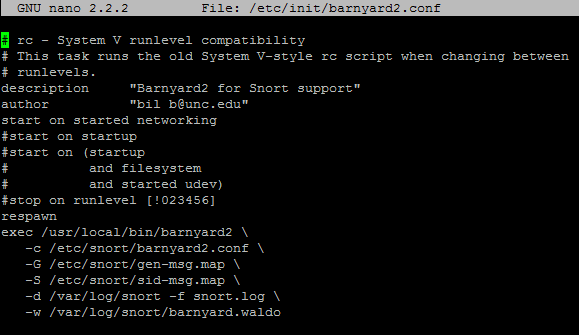
nano /etc/init/barnyard2.conf

# rc - System V runlevel compatibility
# This task runs the old System V-style rc script when changing between
# runlevels.
description "Barnyard2 for Snort support"
author "bil b@unc.edu"
start on started networking
#start on startup
#start on (startup
# and filesystem
# and started udev)
#stop on runlevel [!023456]
respawn
exec /usr/local/bin/barnyard2 \
-c /etc/snort/barnyard2.conf \
-G /etc/snort/gen-msg.map \
-S /etc/snort/sid-msg.map \
-d /var/log/snort -f snort.log \
-w /var/log/snort/barnyard.waldo
save and exit
reboot
Verify Everything Is Working

After your server reboots, log back into it via SSH as root.

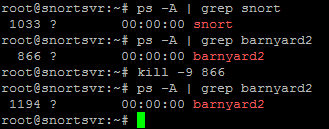
ps -A | grep snort
ps -A | grep barnyard
As long as you see the process ID and the name, you should be OK. You can check that barnyard will auto restart by killing the process ID and then checking to see if it's running. It should have a new ID afterwards.
***EDIT***
I found a much easier solution - install Snorby. Snorby is a pretty nice front-end for Snort. Barnyard is still utilized to take the load off of Snort.
You can grab the All In One solution (installs the OS, MySQL, Snort, Apache, Barnyard, Snorby, Etc) here:
http://bailey.st/blog/snorby-spsa/
Supposedly it auto updates once a day with Oinkmaster, but I haven't really gone through to verify yet. It'd be nice if some of the options were included in the GUI, but for free who am I to complain?