Redirect Websites

Redirect websites using Apache web server!

On the server itself, you can edit the virtualhosts page:
nano /etc/apache2/sites-enabled/000-default

<VirtualHost *:80>
ServerName callmanager
ServerAlias *callmanager
ServerAlias callmanager*
Redirect permanent / https://iocm1/
</VirtualHost>

Or on the webpage itself:

<html>
<head>
<meta http-equiv=”Refresh” Content=”0; URL=http://redirecturl/dir/dir2/”>
</head>
<body>
Link to new page if browser does not support the redirection
</body>
</html>

http://www.yolinux.com/TUTORIALS/ApacheRedirect.html

Install SSL Certificate on Cisco ASA 5510 SSL VPN

It’s never good practice to have your users get used to seeing “Certificate Invalid” errors on secure sites. I know a lot of IT departments that train their users to just click past the errors. What happens when you enable a Man in the Middle attack? Cain and Abel anyone?

So after we had our load balanced ASA5510’s setup, we purchased some licenses for SSLVPN Users. Unfortunately that means the site must be secured AND have a certificate. The self-signed cert is only good for testing. Production requires an authenticated certificate from a globally trusted CA. For our internal-facing sites we utilize GoDaddy (cheap certs).

Create the CSR:
ASDM for Cisco login
Configuration, then Certificate Management, followed by Identity Certificates
Click Add
Click the radio button Add a new identity certificate
Click New… for a new key pair – I generally name it godaddy12 (vendor+year) and make it 2048 bit
In the Certificate Subject DN, Add the CN (vpn.domain.tld MUST BE FQDN), the OU, the O, the C, the St, and the L as appropriate
Click on the advanced button and make sure the FQDN is the same as the CN you entered before (vpn.domain.tld)
Now click on Add Certificate
Browse to where you want to save your CSR – I save it as ASA5510_12.csr.txt

Godaddy Cert
Purchase the cert and download the certificate using the “other” category. That way you get the CA cert (and intermediary) along with your identity certificate.
Log into your ADSM
Select Configuration
Select Device Management
Expand Certificate Management
Select CA Certificates
Click Add, select the gd_bundle.crt
Then select Identity Certificates
Click on your CSR Request and click the Install button
Select your SITENAME.crt

Now we need to apply these certificates to the SSL Site!
Under Configuration, Device Management still
Expand Advanced
Select SSL Settings
Click on the interface where your SSLVPN terminates (in my case it was outside)
Edit this interface
Select the Primary Enrolled Certificate and Load Balancing Enrolled Certificate (if applicable)
Apply the settings

Test your https://vpnsite
If everything tests OK, save the configuration

Windows PE Vista/7

I was trying to get back into the Remote Installation Server (RIS) setup and wanted to run sysprep on my newly formatted laptop. I then wanted to take the image and be able to install it on different hardware but maintain the basic software suite I have grown accustomed to.

All of my stuff is running on 7 at this point save for a few virtual XP testing machines.

You MUST have the AIK (automated installation kit) installed! http://www.microsoft.com/downloads/en/details.aspx?FamilyId=94BB6E34-D890-4932-81A5-5B50C657DE08&displaylang=en
http://www.microsoft.com/downloads/en/confirmation.aspx?familyid=696DD665-9F76-4177-A811-39C26D3B3B34&displaylang=en

Then follow along: (I grabbed all this from http://technet.microsoft.com/en-us/library/dd744537%28WS.10%29.aspx)
Start, All Programs, Microsoft Windows AIK, Right-click on Windows PE Tools Command Prompt and select Run As Administrator.
copype.cmd x86 c:\winpe_x86
copy c:\winpe_x86\winpe.wim c:\winpe_x86\ISO\sources\boot.wim
Dism /Mount-Wim /Wimfile:c:\winpe_x86\ISO\sources\boot.wim /index:1 /MountDir:C:\winpe_x86\mount
copy c:\winpe_x86\ISO\bootmgr c:\winpe_x86\mount
mkdir c:\winpe_x86\mount\boot
xcopy /cherky C:\winpe_x86\ISO\boot C:\winpe_x86\mount\boot\

copy "c:\program files\Windows AIK\Tools\x86\ImageX.exe" c:\winpe_x86\mount
Del c:\winpe_x86\mount\boot\BCD
Bcdedit /createstore c:\winpe_x86\mount\boot\BCD
Bcdedit /store c:\winpe_x86\mount\boot\BCD -create {bootmgr} /d "Boot Manager"
Bcdedit /store c:\winpe_x86\mount\boot\BCD -set {bootmgr} device boot
Bcdedit /store c:\winpe_x86\mount\boot\BCD -create /d "WINPE" -application osloader

The last command returns a GUID value. Substitute this value for in the following examples.
Bcdedit /store c:\winpe_x86\mount\boot\BCD -set GUID osdevice boot
Bcdedit /store c:\winpe_x86\mount\boot\BCD -set GUID device boot
Bcdedit /store c:\winpe_x86\mount\boot\BCD -set GUID path \windows\system32\winload.exe
Bcdedit /store c:\winpe_x86\mount\boot\BCD -set GUID systemroot \windows
Bcdedit /store c:\winpe_x86\mount\boot\BCD -set GUID winpe yes
Bcdedit /store c:\winpe_x86\mount\boot\BCD -displayorder GUID -addlast
oscdimg -n -m -o -bc:\winpe_x86\etfsboot.com c:\winpe_x86\mount c:\winpe_x86\winpe_x86.iso

Then burn the ISO (located in c:\winpe_x86\) to a CD. Now we’re done creating the PE environment.

I went on to run sysprep:
C:\windows\system32\sysprep\sysprep.exe

Enter System Out-of-Box Experience OOBE
Generalize
Quit

It took roughly 10 minutes to run the Sysprep cleanup.
And then booted off my CD (64bit in my case, so just change the appropriate x86 to amd64)

imagex /capture d: d:\data.wim "Drive D"

Server 2003 NTP Domain Controller

I was starting to notice that a few of the servers had different times on them. I only noticed because my desktop clock was different from my phone clock, and the phone system was pointing to my Ubuntu NTP server as it’s time server (which in turn is pointing to ntp.ubuntu.com I believe).

So, 2 domain controllers had the exact same time, 1 had a different time, and yet another still had another different time:
DC1 10:01:05
DC2 10:01:42
DC3 10:00:00 (PDC)
DC4 10:00:00

Not good. So the PDC was being read only by the newest of the domain controllers. So the other two were setup incorrectly. It’s never a good idea to have multiple domain controllers with different time on the clocks. That leads to a bunch of issues. Let’s find out how to fix and why it is wrong.

Check what NTP each DC is fetching information from:

Open a command prompt on any of the domain controllers.
w32tm /monitor /domain:DOMAIN_NAME_HERE

If on a workgroup, you can use the following:
net time /querysntp

If your PDC is not on the correct time, change the what NTP your server is fetching information from:

w32tm /config /manualpeerlist:IP_ADDRESS_OF_NTP_SERVER /syncfromflags:manual /reliable:yes /update

Update your other Servers/DCs to fetch NTP data from your PDC:

On your other servers, open a command prompt.
w32tm /config /manualpeerlist:IP_OF_PDC,0x8 /syncfromflags:MANUAL
net stop w32time
net start w32time
w32tm /resync

/update will allow you to not need to net stop/start the w32time service. I put both in here for my personal reference.

0x8 flag – send request as client mode
0x4 flag – send request as symmetricactive mode
0x2 flag – use as fallback only
0x1 flag – use a special polling interval

** EDIT 9/18/2015 **
Replaced my aging Ubuntu 12.04LTS (an upgrade from 8.04 to 10.04) with a CentOS7.x box for the primary NTP. Noticed that the managed phone clocks were about 2 minutes off from our desktop clocks. The phones were set incorrectly and I had our provider fix, but we were still about 60 seconds off from where we wanted to be.

The replacement server had the same IP, but did NOT have the proper restrict (restrict 10.0.0.0 mask 255.0.0.0) appropriate for our environment. Fixed and service ntpd restart.

Still no love. On the PDC I ran
w32tm /query /peers
And received a State: Pending
Ended up rewriting the manualpeerlist
w32tm /config /manualpeerlist:"10.0.0.254 0.us.pool.ntp.org" /reliable:yes /update
w32tm /resync
w32tm /query /peers
State: Active

Asus O!Play HDP-R1

I purchased an OPlay about a year ago. It’s been great – uses less power than my former HTPC AND the wife likes the ability to navigate via remote only better than my keyboard/mouse/remote combo from before. She (and I) misses the XBMC interface though. That interface is MUCH better than the ASUS one. But who can complain about 14 watts of power and the size of the unit?

So why the post? I was having problems playing Bluray ISO rips. DVD ISO’s played just fine. Bluray m2ts files played just fine. Bluray ISOs would skip quite a bit in terms of the video – audio was always working via the HDMI connection. The odd part was the same files would play just fine over the external USB powered Hard Drive without skipping.

Hardware:
2.5GHz Pentium Dual-Core
1024MB DDR2 PC6400
4X 1.5TB 5400RPM SATA in RAID5 (about 4.2TB usable)
FreeNAS 0.7.1
Gigabit Layer 3 switch

I had set the freenas settings as follows:
Send/Receive buffers were set to 65535
Large read/write was set to on
MTU was set to 9216 (jumbo frames)

Still it was skipping. Since it didn’t happen on the external drive, I assumed that the network was to blame. After a little bit of research I found out that Samba is not nearly as awesome as NFS.

So, turn on NFS on your freenas:

Path of /mnt/raid/Multimedia with Network of 192.168.1.0/24 in my case

Then, telnet to your OPlay and make a few minor settings:

Open Putty
Telnet to the OPlay
Login as “root”
mkdir -p /tmp/ramfs/volumes/core
mount -t nfs -o intr,nfsvers=3,rsize=32768,wsize=32768,hard,udp,nolock 192.168.1.234:/mnt/raid/Multimedia /tmp/ramfs/volumes/core

If you get an error, you did something wrong. Obviously change the IP:/directories to be that of your environment.

If it works, move onto making this a startup script.

cp /usr/local/etc/rcS rcS.old
vi /usr/local/etc/rcS
Scroll down to the end of the file, then press “i”
#Mount NFS
mkdir -p /tmp/ramfs/volumes/core
sleep 15
mount -t nfs -o intr,nfsvers=3,rsize=32768,wsize=32768,hard,udp,nolock 192.168.1.234:/mnt/raid/Multimedia /tmp/ramfs/volumes/core
Press “esc”
Type “:wq” and then hit enter

You should now see your NFS share on your OPlay’s local disk area! Yay!
AND no more skipping issues! YESSSS

I’m running firmware 1.28 NTSC.

What Do You Use?

A lot of people ask what I use to protect my systems. I remember back a few years ago when I could say “nothing, I just don’t infect my machines by clicking ‘yes’ to everything on the web”. Unfortunately those days are long gone. Java, Flash, PDF, Operating System, Cross Site Cookies, and the like are all able to infect your system with potential “baddies” without any user input.

So, the question remains: what do I use?

It depends on what I’m going. But, from the internet on, let me lay it out for you.

I start with firewall rules. I allow, but log, everything outgoing, so long as it comes from the firewall box. If the router receives any requests from an internal IP other than the firewall box, it will log it and then deny the packets. The firewall box is a simple machine running only one item: untangle (7.4 at time of this writing). Untangle is an IPS/IDS solution that’s from open source software with a nice GUI interface.

After that, I have a wireless network and a wired network. They’re both on the same VLAN on the switch, so they can access almost anything. I had been running my wireless network on a separate VLAN, but transferring files between systems was becoming rather difficult. My wireless settings utilize a WPA2-Personal AES encryption algorithm. I also have implemented SSID hiding and MAC address filtering.

All DNS requests first hit my internal DNS server, and, if not found, are forwarded to the router. The router will only utilize OpenDNS DNS servers – any other requests on TCP or UDP 53 are dropped. So even IF you have your own DNS servers setup, you won’t be bypassing mine. OpenDNS is set to not allow for any malicious sites. Untangle is also set to IPS any malicious requests in quarantine and email me the results. If the Untangle box ever is compromised, I am also running a virtual machine Snort variant (snorby) with another system running syslog requests from all network devices. That way I can at least check what happened for later.

If any user wants to download something utilizing bittorrent (I use TED to download TV episodes I may have missed), I use a Virtual Machine running on top of Linux (or just Linux itself) to test out the products. It’s much easier to “fix” a virtual machine than it is to fix a real system (Delete!).

Each linux system is running ClamAV of some kind. Each Windows system is running Nod32.

Each windows client is also running the following software:
Threatfire
Secunia PSI
Malwarebytes

The one open system that anyone who visits can use is running Windows XP SP3 with SteadyState set to wipe everything after a reboot.

Paranoid? Sometimes. But there’s always a way to get into any system. I’m just trying to make it more difficult.

So what do you use? Comment and let me know.

Testing RAID and HD Speeds under *nix

I was given the task of purchasing a NAS/SAN solution for a secondary (dev) oracle database (11g). Pricing it out on the normal branded websites yielded roughly $12,000 to $30,000 depending on the options. A quick look at newegg gave me a lot more for less coin.

H55 Intel board, i3 2.93GHz dual core, 2GB DDR3 1333 dual channel, 6x 2TB 7200RPM SATA HDs in hot swapable cages, 4U case, Redundant 500Watt PSU, 8x RAID controller (SAS/SATA), Intel 10/100/1000. $2250. We could technically buy 5 of these for the lowest price of a branded system. But would it be fast enough?

Linux has this command for finding disk speeds:
/sbin/hdparm -t /dev/yourHDhere
And on my test system, here are the results:

Timing buffered disk reads: 202 MB in 3.01 seconds = 67.16 MB/sec

You can find out the path of the HD you want by:
df -h

That’s on a pretty decent VMWare box. On a real box, with much lower specs, the read times were abysmal:

Timing buffered disk reads: 10 MB in 3.32 seconds = 3.01 MB/sec

I guess IDE HD’s on P4 1.8GHz systems are not the best…
To find out your processor information:
cat /proc/cpuinfo

So how about on my NAS/SAN solution? Unfortunately the command /sbin/hdparm will not work as the OS on this machine is FreeBSD. However, there is a similar command for BSD:
diskinfo -t /dev/yourHDhere
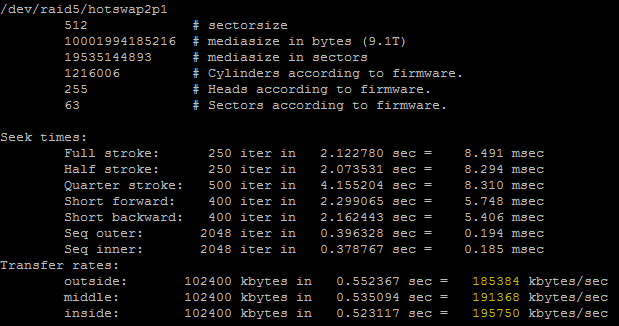
So you can see that the average for software RAID5 is 190834KB/sec (186.36MB/sec). That’s pretty stellar.

Next I’ll be trying RAID5 on the hardware card, followed by RAID10 on that same card. I’ll post the results as soon as I can.

***EDIT***

RAID5 on an Areca ARC-1222
466.74MB/sec using the exact same hardware setup. Next will be trying RAID1+0.

RAID10 is actually slower. It’s showing 319.70MB/sec. I’m going to try with the following commands from /mnt/raidcontainer:
dd if=/dev/zero of=testfile bs=1M count=5000
and
dd if=/dev/zero of=testfile bs=8K count=5000
to see what is up.

254MB/sec on 1MB writes over 5000 attempts. I’m trying to find out how to not cache disk copies on the smaller file – it gave me over 1000MB/sec… 🙂

***EDIT again***
OK, so FreeBSD doesn’t allow for the oflag on dd, so we have to use conv=sparse instead (and I changed to 50000):
dd if=/dev/zero of=testfile bs=8K count=50000 conv=sparse
Which gives me 265MB/sec using 8K files. Not a bad idea of the range. I think that I must go back to HW RAID5 for a complete list of read and writes.

***EDIT 4***
I built another FreeNAS system (0.7.2.5543 x64) with the following specs:
H55 Intel board, i3 3.06GHz dual core, 4GB DDR3 1333 dual channel, 8x 2TB 7200RPM SATA HDs in hot swapable cages, 4U case, Redundant 658Watt PSU, 8x RAID controller (areca arc-1222) with battery backup cache, Intel 10/100/1000, dummy gig switch with jumbo frame support. $2800.
dd if=/dev/zero of=testfile bs=8K count=500000 conv=sparse

340MB/sec! Although the older rig averaged 44MB/sec per drive, this one is at 42.5MB/sec per drive. After this I think the primary issue will be the raid controller as a bottleneck.

Ramblings Of An IT Person