Split Giant ISO Into Smaller Files

OK, so I uploaded a 3GB ISO file to my site for future downloads. Unfortunately for me, whenever I attempted to download the file I was met by:

Forbidden

You don’t have permission to access /path/to/file/nameoffile.iso on this server.

Additionally, a 403 Forbidden error was encountered while trying to use an ErrorDocument to handle the request.

Dumb. Good thing I have access to the log files. The error from apache stated:

value too large for defined data type

More dumb. As this is from my hosting company I can’t just go ahead and update the kernel or replace any config files I need. So I just needed to be able to compress the file and make multiple archives. Thanks to some command line tar I can do just that:

tar cvzf - nameofyourfile.iso | split -d -b 700m - nameyouwantyourfiletobe.iso.tar.gz.
Notice the trailing ‘.’ – this is used to create filename.iso.tar.gz.01, filename.iso.tar.gz.02 etc.

Now I just have to play the waiting game for it to finish.

AND if you want to restore it later to ISO format:
cat filename.iso.tar.gz.* | tar xvzf -

VMWare Server Ubuntu 9.10

OK, I had to install VMWare Server 2.0.2-203138 onto a 9.10 fully-up-to-date 32bit server. 9.04 and before it was easy, but there’s something added onto 9.10 to make it a little more difficult to install.

What we’ll be doing:
Update your server
I first downloaded the vmware-server from vmware.com.
Create a script called vmware-server-2.0.x-kernel-2.6.31-14-install.sh
Run the script

Really? 4 steps? Yes.

Download VMWare Server from Vmware.com

apt-get update
apt-get upgrade
apt-get dist-upgrade

nano vmware-server-2.0.x-kernel-2.6.31-14-install.sh
The file you should copy is quoted at the bottom of this post. It’s large. I didn’t write it, but it works quite well.
Save this file

chmod +x vmware-server-2.0.x-kernel-2.6.31-14-install.sh
./vmware-server-2.0.x-kernel-2.6.31-14-install.sh

#!/bin/bash

###############################################################################
# @author Radu Cotescu #
# @version 1.1 Mon Jan 18 15:24:39 EET 2010 #
# #
# For further details visit: #
# http://radu.cotescu.com/?p=1095 #
# #
# This script will help you install VMWare Server 2.0.x on Ubuntu 9.10. #
# Based on a script from http://communities.vmware.com/thread/215985 #
# #
# This script must be run with super-user privileges. #
# Usage: #
# ./vmware-server-2.0.x-kernel-2.6.31-14-install.sh [PATH TO VMWARE ARCHIVE] #
# If you do not specify the PATH the script will scan the current folder for #
# VMware server archive and if doesn’t find anything it will exit. #
###############################################################################

VMWARE_HOME=$1
PATCH=”vmware-server-2.0.2-203138-update.patch”

display_usage() {
echo “This script must be run with super-user privileges.”
echo -e “\nUsage:\n./vmware-server-2.0.x-kernel-2.6.31-14-install.sh [PATH TO VMWARE ARCHIVE]\n”
echo “If you do not specify the PATH the script will scan the current folder”
echo “for VMware server archive and if doesn’t find anything it will exit.”
exit 1
}

check_usage() {
if [ ! $params -le 1 ]
then
display_usage
fi
if [[ ($param == “–help”) || $param == “-h” ]]
then
display_usage
fi
}

check_user() {
if [[ $USER != “root” ]]; then
echo “This script must be run as root!”
exit 1
fi
}

set_workspace() {
if [[ -z $VMWARE_HOME ]]; then
VMWARE_HOME=”`pwd`”
fi
VMWARE_ARCHIVE=`ls “$VMWARE_HOME” 2> /dev/null | egrep “^(VMware-server-2.0.[0-9]-)[0-9]*.[A-Za-z0-9_]*.tar.gz”`
MODULES_DIR=”$VMWARE_HOME/vmware-server-distrib/lib/modules”
MODULES_SOURCE=”$MODULES_DIR/source”
}

check_archive() {
if [[ -z $VMWARE_ARCHIVE ]]; then
echo -e “There is no archive containing VMware Server in the path you indicated!\n”
exit 1
else
echo -e “You have VMware Server archive: \n\t$VMWARE_ARCHIVE”
fi
}

check_distro() {
ubuntu=`cat /etc/*-release | grep Ubuntu`
fedora=`cat /etc/*-release | grep Fedora`
suse=`cat /etc/*-release | grep SUSE`
if [[ ! -z $ubuntu ]] ; then
distro=”ubuntu”
elif [[ ! -z $fedora ]] ; then
distro=”fedora”
elif [[ ! -z $suse ]] ; then
distro=”suse”
fi
}

packageError() {
if [[ $1 -ne 0 ]]; then
echo “I am unable to install the before mentioned package…”
echo “Please install the required package and rerun the script…”
exit 1
fi
}

resolveDepsUbuntu() {
echo “Checking for needed packages on Ubuntu”
check_wget=`dpkg-query -W -f=’${Status} ${Version}\n’ wget 2> /dev/null | egrep “^install”`
if [[ -z $check_wget ]]; then
echo “Installing wget package…”
apt-get -y install wget
packageError $?
else echo “You do have the wget package…”
fi
LINUX_HEADERS=”linux-headers-`uname -r`”
check_headers=`dpkg-query -W -f=’${Status} ${Version}\n’ $LINUX_HEADERS 2> /dev/null | egrep “^install”`
if [[ -z $check_headers ]]; then
echo “Installing linux-headers-`uname -r` package…”
apt-get -y install linux-headers-`uname -r`
packageError $?
else echo “You do have the $LINUX_HEADERS package…”
fi
check_build=`dpkg-query -W -f=’${Status} ${Version}\n’ build-essential 2> /dev/null | egrep “^install”`
if [[ -z $check_build ]]; then
echo “Installing build-essential package…”
apt-get -y install build-essential
packageError $?
else echo “You do have the build-essential package…”
fi
check_patch=`dpkg-query -W -f=’${Status} ${Version}\n’ “patch” 2> /dev/null | egrep “^install”`
if [[ -z $check_patch ]]; then
echo “Installing patch package…”
apt-get -y install patch
packageError $?
else echo “You do have the patch package…”
fi
}

resolveDepsFedora() {
echo “Checking for needed packages on Fedora”
if [[ -z `rpm -qa wget` ]]; then
echo “Installing wget…”
yum -y install wget
packageError $?
else echo “You do have the wget package…”
fi
if [[ -z `rpm -qa xinetd` ]]; then
echo “Installing xinetd…”
yum -y install xinetd
packageError $?
else echo “You do have the xinetd package…”
fi
if [[ -z `rpm -qa kernel-headers` ]]; then
echo “Installing kernel-headers…”
yum -y install kernel-headers
packageError $?
else echo “You do have the kernel-headers package…”
fi
if [[ -z `rpm -qa kernel-devel` ]]; then
echo “Installing kernel-devel…”
yum -y install kernel-devel
packageError $?
else echo “You do have the kernel-devel package…”
fi
if [[ -z `rpm -qa gcc` ]]; then
echo “Installing gcc…”
yum -y install gcc
packageError $?
else echo “You do have the gcc package…”
fi
if [[ -z `rpm -qa patch` ]]; then
echo “Installing patch…”
yum -y install patch
packageError $?
else echo “You do have the patch package…”
fi
if [[ -z `rpm -qa make` ]]; then
echo “Installing make…”
yum -y install make
packageError $?
else echo “You do have the make package…”
fi
}

resolveDepsSuse() {
echo “Checking for needed packages on SUSE”
if [[ -z `rpm -qa wget` ]]; then
echo “Installing wget…”
zypper –non-interactive install wget
packageError $?
else echo “You do have the wget package…”
fi
if [[ -z `rpm -qa linux-kernel-headers` ]]; then
echo “Installing linux-kernel-headers…”
zypper –non-interactive install linux-kernel-headers
packageError $?
else echo “You do have the linux-kernel-headers package…”
fi
if [[ -z `rpm -qa kernel-source` ]]; then
echo “Installing kernel-source…”
zypper –non-interactive install kernel-source
packageError $?
else echo “You do have the kernel-source package…”
fi
kernel_type=`uname -r | awk ‘BEGIN { FS = “-” } ; { print $3 }’`
if [[ -z `rpm -qa kernel-$kernel_type-devel` ]]; then
echo “Installing kernel-$kernel_type-devel…”
zypper –non-interactive install kernel-$kernel_type-devel
packageError $?
else echo “You do have the kernel-$kernel_type-devel package…”
fi
if [[ -z `rpm -qa gcc` ]]; then
echo “Installing gcc…”
zypper –non-interactive install gcc
packageError $?
else echo “You do have the gcc package…”
fi
if [[ -z `rpm -qa patch` ]]; then
echo “Installing patch…”
zypper –non-interactive install patch
packageError $?
else echo “You do have the patch package…”
fi
if [[ -z `rpm -qa make` ]]; then
echo “Installing make…”
zypper –non-interactive install make
packageError $?
else echo “You do have the make package…”
fi
}

install() {
case $distro in
“ubuntu”)
resolveDepsUbuntu
;;

“fedora”)
resolveDepsFedora
;;

“suse”)
resolveDepsSuse
esac
echo “Downloading patch file…”
wget http://codebin.cotescu.com/vmware/$PATCH -O “$VMWARE_HOME/$PATCH”
if [[ ! -e “$VMWARE_HOME/vmware-server-distrib” ]]; then
echo Extracting the contents of $VMWARE_ARCHIVE
tar zxf “$VMWARE_HOME/$VMWARE_ARCHIVE” -C “$VMWARE_HOME”
fi
echo “Checking patch download and archives from the extracted folders…”
if [ ! -r “$VMWARE_HOME/$PATCH” ]; then
echo “The download of $PATCH from http://codebin.cotescu.com/vmware/ failed!”
echo “Check your internet connection. :(”
exit 1
fi
TARS=`find “$MODULES_SOURCE” -maxdepth 1 -name ‘*.tar’`
if [ ! “$TARS” ]; then
echo “.tar files from $MODULES_SOURCE appear to be missing!”
echo “Cannot continue process. :(”
exit 1
fi
BASES=””
for TARFILE in $TARS
do
BASE=`basename “$TARFILE” | rev | cut -c5- | rev`
BASES=”$BASES $BASE”
echo “Found .tar file for $BASE module”
done
echo “Extracting .tar files in order to apply the patch…”
for BASE in $BASES
do
TARFILE=”${BASE}.tar”
MODDIR=”${BASE}-only”
echo “Untarring $MODULES_SOURCE/$TARFILE”
tar -xf “$MODULES_SOURCE/$TARFILE” -C “$MODULES_SOURCE”
if [ ! -d “$MODULES_SOURCE/$MODDIR” ]; then
echo “$TARFILE tarball failed to extract in the directory $MODDIR. :(”
exit 1
fi
done
echo “Testing patch…”
patch –dry-run -N -p1 –directory=”$VMWARE_HOME/vmware-server-distrib” -s < "$VMWARE_HOME/$PATCH" RESULT=$? if [ "0" != "$RESULT" ]; then echo "The patch cannot be applied. :(" exit 1 fi echo "Applying patch..." patch -N -p1 --directory="$VMWARE_HOME/vmware-server-distrib" -s < "$VMWARE_HOME/$PATCH" RESULT=$? if [ "0" != "$RESULT" ]; then echo "A problem occured with the patch while it was being applied. :(" exit 1 fi for BASE in $BASES do TEMPFILE="${BASE}-temp.tar" MODDIR="${BASE}-only" echo "Preparing new tar file for $BASE module" rm -f "$MODULES_SOURCE/$TEMPFILE" tar -cf "$MODULES_SOURCE/$TEMPFILE" -C "$MODULES_SOURCE" "$MODDIR" done echo "Checking that the compiling will succeed..." for BASE in $BASES do # Skip checking vmppuser module because it's badly broken dead code if [ "vmppuser" != "$BASE" ]; then MODDIR="${BASE}-only" echo "Trying to compile $BASE module to see if it works" echo "Performing make in $MODULES_SOURCE/$MODDIR" make -s -C "$MODULES_SOURCE/$MODDIR" RESULT=$? if [ "0" != "$RESULT" ]; then echo "There is a problem compiling the $BASE module after it was patched. :(" exit 1 fi fi done echo "Rebuilding tar files..." for BASE in $BASES do TEMPFILE="${BASE}-temp.tar" TARFILE="${BASE}.tar" OFILE="${BASE}.o" MODDIR="${BASE}-only" echo "Replacing original file $TARFILE with patched file..." rm -rf "$MODULES_SOURCE/$TARFILE" "$MODULES_SOURCE/$OFILE" "$MODULES_SOURCE/$MODDIR" mv -f "$MODULES_SOURCE/$TEMPFILE" "$MODULES_SOURCE/$TARFILE" done echo "Removing binaries directory..." rm -rf "$MODULES_DIR/binary" echo "Starting VMware Server original install script..." $VMWARE_HOME/vmware-server-distrib/vmware-install.pl } clean() { echo "Housekeeping..." rm -rf $VMWARE_HOME/vmware-server-distrib "$VMWARE_HOME/$PATCH" echo "Thank you for using the script!" echo -e "Patch provided by: \n\tRamon de Carvalho Valle" echo -e "\thttp://risesecurity.org" echo -e "Script author: \n\tRadu Cotescu" echo -e "\thttp://radu.cotescu.com" } params=$# param=$1 check_usage params param check_user set_workspace check_archive check_distro install if [[ $distro == "fedora" ]]; then echo "On Fedora you must follow these steps in order to make VMware Server to work properly:" echo -e "\t1. edit /etc/services and replace the entry located on TCP/902 port with vmware-authd" echo -e "\t2. set SELinux to permissive or even disable it by editing the /etc/selinux/config file" echo -e "\t3. reboot your system" fi clean exit 0

Purple Pidgin Plugin Pack

That’s a lot of P’s!

After months of using (and really liking) the purple plugin pack for pidgin on my Windows machine, I wanted to get it working on my Linux machine as well.

HP Laptop running Ubuntu 9.10 x64 fully up-to-date (2.6.31-17-generic)
Pidgin version 2.6.2

All I did was:
sudo apt-get install pidgin-plugin-pack

Then all of the plugins were installed – I just had to activate them.

FreeNAS Slow File Copy

I recently built a fairly nice NAS system for a customer:
0.7 Khasadar (revision 4919)
2.5GHz Dual Core Pentium
4GB DDR2 PC1066
5x hot swap 2TB SATA
10/100/1000 Intel Pro NIC
10/100/1000 Full duplex switch connection

After formatting the drives in SoftRAID 5 (1.8TB x 4 = 7.2TB – 5% for defragmentation = 6.84TB available), I started to backup many of their ISOs and daily computer backups and other logs. Everything was going smoothly using Windows File Sharing (Samba) until I got to the larger files.

Initially the files would copy at 80+MB/sec, but then they’d slow down to 50… 30… 20… even down to 8 or so MB/sec. Ouchies when you’re talking about a 40+GB file to transfer. FTP yielded the same results. I noticed that sometimes the drives on the NAS wouldn’t even be blinking, so it had to be another issue.

If you login on the web panel of the FreeNAS, under Services you will find CIFS/SMB.
Check under Advanced Settings
You’ll see Send and Receive buffer sizes – by default they are 16MB (16*1024 = 16384)
I changed the buffer size to 128MB (128*1024 = 131072) and checked the results

120MB/sec, slow down to 80… 70… 60… So 60MB/sec. That’s over 6 times faster at a cost of 8 times the RAM. I can live with that.

So just for jollies I increased it to 512MB and then to 1024MB. Both stopped around 70MB/sec. Then, as a final test, I dropped it down to 256MB (256*1024 = 262144), which seemed to be OK.

Outlook Auto Complete NK2

Have you ever noticed how great the auto complete function is for Outlook? Just start typing a name and all the contacts that you’ve ever emailed in the past will auto show up. That allows you to select from the list – which is especially helpful when you’ve forgotten part of someone’s name but know you’ve emailed them before.

The file that allows for this to happen is called the NK2 file. To see this file you may want to make sure you can see hidden files (In any Windows window, click Tools then Folder Options. Then under the view tab, click Show hidden files, folders, and drives. If you can’t find the Tools menu, hit the Alt key)

Windows 2000/XP
C:\Documents and Settings\USER_NAME\Application Data\Microsoft\Outlook\Outlook.NK2

Windows Vista/7
C:\Users\USER_NAME\AppData\Roaming\Microsoft\Outlook\Outlook.NK2

Problem 1:
I have a new computer and want to move this over.
This is the easiest to accomplish. Just make sure that Outlook is closed (fully closed, check the task manager if you have any doubts), and copy the NK2 file from the old system and paste it into the new system.

Problem 2:
My auto completes stopped working.
This has a fairly high success rate, but no guarantees. Basically this happens when your NK2 file becomes corrupt. Now, I think there are some utilities out there that are “supposed” to fix this, but the best bet I found was to just:
Close Outlook fully
Copy Outlook.NK2 to OutlookCopy.NK2
Delete Outlook.NK2
Open Outlook, send an email, close Outlook fully
Delete Outlook.NK2 again (it should have made another because you sent an email)
Rename the OutlookCopy.NK2 file to Outlook.NK2
Open Outlook

Your auto completes should now work!

I honestly haven’t come across any other problems regarding NK2 files. And I’ve only tried them from the same versions (2007 to 2007, and 2003 to 2003), so if you’re trying to move from 2003 to 2010 Outlook and this doesn’t work… sorry?

Tested OK on Windows XP, Vista, 7. Using Office 2003, 2007.

Your message did not reach some or all of the intended recipients

Undeliverable NDR:

Several users were complaining that whenever they’d send a calendar invite to a specific person that they would get an NDR back saying that a user was not found in the organization. Unfortunately the user that does not exist was not in the original calendar invite.

Server is 2003 Enterprise running Exchange 2003 Standard. Clients are using Office 2007 (outlook) SP2 fully updated.

Actual message is as follows:

Your message did not reach some or all of the intended recipients.

Subject: Rehearsal: School Play @ 4:30pm – 6pm
Sent: 1/7/2010 11:19 AM

The following recipient(s) cannot be reached:

Robert LastName on 1/7/2010 11:19 AM
The e-mail account does not exist at the organization this message was sent to. Check the e-mail address, or contact the recipient directly to find out the correct address.

It’s obviously been edited as to not show the real names of people and servers. But you get the general idea.
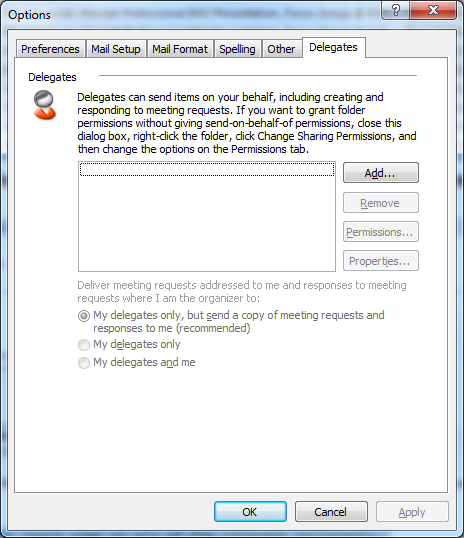
The problem was with a delegate assigned by a current user pointing to the non-existent user. When a user is deleted in AD they do not automatically get removed from delegation on Outlook. So here’s the fix with a few screen shots:

In Outlook on the offending system (the person who you are sending invites TO when receiving the NDR), go to Tools > Options.
Click on the Delegates Tab
Remove the offending user

Networking 101

I’m going to try to make this as easy to understand as possible so bear with me. It’s a very geeky topic and I’m not usually a great writer, so I’ll try to not make it incredibly boring. Or long. Well, it’ll probably be long, but it should be a decent read.

OSI Model
First we have to at least look at the OSI (Open System Interconnection) model. You don’t have to completely understand it, but a few reference points would be mighty handy.
There are 7 layers to the OSI model:
1.) Physical Layer – The actual physical connection (modem cable, serial cable, ethernet cable, etc)
2.) Data Link Layer – Provides the functionality and means to transfer data (MAC Addresses)
3.) Network Layer – IP layer (TCP and UDP)
4.) Transport Layer – Provides reliability controls to the layers above (QoS)
5.) Session Layer – Mechanism for opening and closing sessions
6.) Presentation layer – Encryption layer, also responsible for formatting data for the Application layer
7.) Application Layer – Final layer in which applications (Web browser, Email client) take the formatted data and display it for the user

Keywords
Next I’d like to try out keywords – just to see if you know what is what.
ICMP – Internet Control Message Protocol, or Ping, is used to send error messages regarding host connectivity
Packet – Payload of formatted data sent by network devices
MAC Address – Media Access Control address is a unique physical ID embedded on every network device. It’s a 48bit address of six groups of 2 digits separated by hyphens or colons (01-23-45-67-89-ab)
IP Address – Internet Protocol address is a numbered 32bit address consisting of four groups of 3 digits separated by periods (127.0.0.1 and 192.168.1.1)
Switch – a switch is a device with multiple ethernet ports that connects network devices
Router – Chooses paths for packets and connects different networks together
Ethernet – Patch cable, consists of 8 wires with an RJ45 connector. It’s like a phone cable on drugs.
QoS – Quality of Service. Allows for certain traffic to be flagged at higher priorities than other traffic. Usually Servers beat out clients, and IP Phone conversations beat out web browsing.
Duplex – Full or half duplex. Full duplex means a network connection can send AND receive at the same time at the same speed. Half duplex is a walkie-talkie system in which the system must wait for a free moment to speak.
WAN/LAN – Wide area network/Local area network. WAN refers to an internet/cloud connection, LAN refers to any locally connected devices. WLAN refers to Wireless Local Area Networks.
NAT – Network address translation. Allows for several systems to use the same public IP address at the same time.
Ports – a connection on a switch, hub, or router.
TCP Ports – Ports are added onto TCP/UDP packet headers for destination use. Ports range from 0 to 65535. Port 80 is used for web browsing.

I already know that I will have to write up another one for IPv6 information. This is only for IPv4. IPv4 addresses are said to be exhausted by June 2011.

What is an IP address?
The basic building block of the internet is the IP address. IP addresses (IPv4 anyway) are 4 sets of numbers 0 through 255 separated by a ‘.’ Examples include 4.2.2.2, 192.168.1.1, 172.16.40.254.
There are Class A, Class B, Class C, Class D, and Class E networks (for all of our purposes you only have to remember AB and C).
Class A: 128 available networks each having 16,777,216 IP addresses. Start address is 0.0.0.0 end address is 127.255.255.255
Class B: 16,384 available networks each having 65,536 IP addresses. Start address is 128.0.0.0 end address is 191.255.255.255
Class C: 2,097,152 available networks each having 256 IP addresses. Start address is 192.0.0.0 end address is 223.255.255.255
Class D: Used for multicast on networks, reserved for private use. Start address is 224.0.0.0 end address is 239.255.255.255
Class E: Reserved but not in use. Start address is 240.0.0.0 and end address is 255.255.255.255
Unfortunately not all IP address can be used – there are quite a few that are reserved for private purposes:
0.0.0.0 through 0.255.255.255 is known as the Zero Addresses and cannot be used currently.
10.0.0.0 through 10.255.255.255 is a private IP address scheme for Class A. These are unroutable IP addresses (they only exist in private networks).
127.0.0.0 through 127.255.255.255 is a localhost/loopback address range. 127.0.0.1 is always set as the localhost and can not be routed to the internet.
169.254.0.0 through 169.254.255.255 is for zeroconfig addresses when a DHCP server is not working or present on the network.
172.16.0.0 through 172.31.255.255 is a private IP address scheme for Class B. These are unroutable IP addresses (they only exist in private networks).
192.168.0.0 through 192.168.255.255 is a private IP address scheme for Class C. These are unroutable IP addresses (they only exist in private networks).
224.0.0.0 through 239.255.255.255 is reserved for multicast use. These are unroutable IP addresses.
240.0.0.0 through 255.255.255.255 is reserved and not used in the routing of internet IPs.

What the heck is Netmasking?
Netmasking is a way to differentiate between networks. This is also called subnetting. In the early days of the internet, if a company needed more IP addresses than a Class B network (say 67 thousand IP addresses were “needed”), they’d have to get either 2 class B networks (need 67 thousand, given 131 thousand) or a class A network (need 67 thousand, given 16 million). Now we have a way to lower the number of IPs given out for each class.
You may have seen the netmask 255.255.255.0 before – it’s the most common for home networks. You probably have an IP address of 192.168.1.50 with a netmask of 255.255.255.0. The 255’s mean that the network you are currently on must match. So your network is 192.168.1.0 through 192.168.1.255. If you had a subnet of 255.255.0.0 your network would be 192.168.0.0 through 192.168.255.255. If you had a subnet of 255.0.0.0 your network would be 192.0.0.0 through 192.255.255.255. See how that works?
And yes, you can divide it further – since there are only 2 million available class C networks we can divide them further:
192.168.1.0 with a netmask of 255.255.255.128 would mean that you have the network 192.168.1.0 through 192.168.1.127. If you have 192.168.1.128 with a netmask of 255.255.255.128 that would mean you have 192.168.1.128 through 192.168.1.255. That gives you 128 hosts.
Ah, but we can do better than that. What if you only want 16 hosts? 192.168.1.0 netmask 255.255.255.240. IP range would be 192.168.1.0 through 192.168.1.15. It’d also be a range of 192.168.1.16 through 192.168.1.31. Also 192.168.1.32 through 192.168.1.47. See how that works?
Each of these networks is different. In the last example with the netmask of 255.255.255.240, we see that all of the IP addresses have a 192.168.1.X start. But a computer with an IP of 192.168.1.4/255.255.255.240 could NOT ping a computer with an IP of 192.168.1.18/255.255.255.240 without the use of a router.

What’s so special about routers?
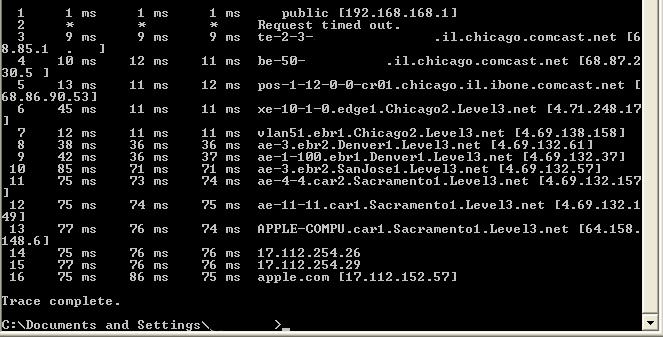
A router, or layer 3 switch, is required to connect different networks. If you were to run a trace route to apple.com, you will see that many routers are necessary for your packet to succeed. Here’s mine:
tracert
As you can see, my ping goes through the following:
A computer at 192.168.168.151 - My computer
A router at 192.168.168.1 - Local
A router at 68.85.1x.x - neighborhood
A router at 68.87.230.5x - Central Office
A router at 68.86.90.53 - Chicago backbone provider
A router at 4.71.248.17 - Chicago backbone provider
A router at 4.69.138.158 - Denver backbone provider
A router at 4.69.132.57 - San Jose backbone provider
A router at 4.69.132.157 - Sacramento backbone provider
A router at 4.69.132.149 - Sacramento backbone provider
A router at 64.158.148.6 - Apple Sacramento backbone provider
A router at 17.112.254.26 - Apple router
A router at 17.112.254.29 - Apple router
A webserver at 17.112.152.57 - Apple.com
That’s 12 routers just to get to apple.com. Impressive.
You’ll see that there are 12 different networks connected via a series of routers. None of this would be possible without these routers.

How does this all work?
MAC addresses, route tables, and a lot of configuration. Without getting too advanced (Keep It Simple Stupid KISS):
A switch will “remember” what port each MAC address is from. If the switch doesn’t know a MAC address source, it will write the MAC address and port number to it’s memory for future reference. If a switch doesn’t know the MAC destination, however, it will flood every port with the data. If no network responds, the switch simply throws out the packets of data.

A router will “remember” what port each MAC address is from. Remember that MAC addresses are physical addresses at the Layer 2. IP addresses are at Layer 3, so a conversion takes place:
Computers A and B are connected to a Switch. Computer A (192.168.1.2, MAC of 00-00-00-00-00-01) wants to send information to Computer B (192.168.1.3, MAC of 00-00-00-00-00-02). Computer A sends the packet to “192.168.1.3”. The switch looks in it’s table for that IP address. If it finds the IP, it then grabs the associated MAC address and finds what port that MAC is connected to. It then sends the data out that port. If the switch does NOT find the IP, it will send out the data to each port on the switch except the port it came from. If it gets a response, it will record the MAC address and port from the respondee. In our case, it’s computer B with 00-00-00-00-00-02.

What’s the difference between a router, a switch, and a hub?
A router routes, a switch switches, and a hub… well a hub just kinda sits there. Technically speaking, a Router will connect networks together, a switch will allow different network devices to communicate on the same network, and a hub extends the physical network. A hub is shared networking – if you have a 10/100 hub with 8 ports, each of the ports will share the total bandwidth of 100Mb. Hubs are half-duplex and are referred to as “dumb”. Switches are full-duplex and each port gets the entire bandwidth allotment. Many home routers also include a switch. A common example is a Linksys wireless router – it will include a WAN port, 5 LAN ports, and a pair of antennas.

So what about this layer 3 stuff?
The most common layer 3 protocols are TCP and UDP. While both protocols are basically the same in terms of the header/source/destination, they differ greatly in terms of usage. TCP is used when data integrity is required. Each packet of data is numbered and acknowledged. If a packet is “missing”, the computer will resend the same packet to the destination. UDP, on the other hand, has no integrity check. If a packet is received out of order it is discarded by the destination. Why would you want to discard out of order packets and not have the sender resend them? IP Phones, streaming video, streaming audio. Can you imagine talking on the phone and having parts of your conversation show up later? UDP is great for Live events – events where a delay is not accepted. TCP is used when integrity is required – grabbing email, downloading files, etc.

How about this “private” and “public” IP stuff?
Private IP addresses are those that can not be routed through the internet. Although technically you can use a “private range” of 17.112.152.x with a subnet of 255.255.255.0 on your home router, you would not be able to visit any apple websites. So, to keep things easier for everyone, the most common Private IPs are: 192.168.x.x, 172.16.x.x-172.31.x.x, and 10.x.x.x.

How is that different from your public IP? Most home users have a single Public IP, and usually it’s not statically assigned (meaning it can and will change if you ever lose your internet connection). Visit http://whatismyip.com sometime and see what your public IP address really is. We’ll assume that your private IP is 192.168.1.2 and your public IP is 17.112.152.57. A simple host lookup on the public IP will yield apple.com. If you were to ping apple.com, you will receive a response from the public IP (still 17.112.152.57). How can the two IP addresses be different? Because you have a router!

If you have a home network with 4 computers connected (2 laptops, a desktop, and an Xbox360), each has their own private IP (192.168.1.2, 192.168.1.3, 192.168.1.4, and 192.168.1.5 respectively), but they all share your public IP of 17.112.152.57. There is a process known as NAT that allows each of these devices to share a single public IP address. Every request sent outward to the internet gets modified by the router to have a unique source port. That way when the data comes back the unique source-turned-destination port will allow the router to “remember” which system requested the data. So if you’re browsing the web on your laptop while downloading updates on the xbox, there should be no conflicts of data.

Ports? What’s port 443?
Common ports are easy to find out. When you send for information from a website, it will run under port 80. If you want to request from a secure website, it will run under port 443. Common ones:
21 FTP
23 telnet
25 SMTP
53 DNS
80 HTTP
110 POP3
443 HTTPS
Your router will request the page on your behalf, sending the request to port 80 at apple.com. But it will inject port 57803 (random port number) as the source. When apple.com replies, the source is port 80 and their destination is your router at port 57803. The router then knows that you were requesting the information and forwards it onto you. Obviously this is done much more rapidly than I can type or you can read.

Hopefully that helps a little bit with the understanding of IPs and networking. I’ve only touched the surface when it comes to explaining all of this. And since I’m more of a visual learner, I’ll probably draw some pictures eventually.
Ramblings Of An IT Person