Category Archives: Microsoft

All Microsoft Products (Exchange, SQL, Windows, Server)

O365 Powershell CLI

Needed to connect to O365 when my account has MFA enabled.

New computer, so here’s the full setup.

Using Internet Explorer or Edge, open your ECP/EAC (Admin of Exchange) portal page on your O365 account.
Click on Hybrid
Click on Configure
This installs a clickonce app for the Exchange Online powershell module.

Open PowerShell as an Administrator
winrm quickconfig
Enable per the wizard
winrm set winrm/config/service '@{AllowUnencrypted="true"}'
winrm set winrm/config/service/auth '@{Basic="true"}'

Now connect to your O365 system
Open PowerShell (the exchange-based one from the first steps)

Connect-EXOPSSession -UserPrincipalName yourusername@yourdomain.tld
If prompted, sign in

Top of Screen Black Bar

Windows 10 Pro 1809/1903/1909, Pro N 1909 have all experienced this issue in my tenure. I’m sure it’s more than that.

Basically when I have a maximized application on my primary screen, the top of the screen is blank (black bar). This has happened with Chrome, Slack, and Adobe so far. I should point out that this is both through a docking station as well as direct monitor connections; in any case I have 2 total displays active.

I’m not sure of a permanent fix, but the temporary ones include:

  1. Moving the application to the secondary monitor
  2. Un maximizing the application
  3. Pressing Shift + Ctrl + WIN + B – this resets the video driver
  4. Reboot

The reset of the video driver is not very impactful and definitely fixes my issue, so I usually try that one first.

Windows 10 Start Menu Search Blank

So my freshly-installed Windows 10 Pro N 1909 had an issue – I have gotten so used to pressing Windows Key and then typing “settings” or “control panel” or “my document name here”. Unfortunately I was greeted with a blank search box instead. Nothing loaded. Just blank. Gray even. Light gray.

So I searched trusty Dr. Google for the answer.

One recommendation was to remove Bing Search from showing in my search box. Fired up regedit:

HKCU\SOFTWARE\Microsoft\Windows\CurrentVersion\Search

Add DWORD "BingSearchEnabled" =0

Since I haven’t rebooted yet I don’t know if that will actually fix anything. But here we are anyway.

Next I restarted the Windows Search service.

Start > Run > Services.msc
Right-click and restart Windows Search service

That didn’t help either.

Finally I just killed the SearchUI.exe in task manager (don’t worry, it auto restarts itself).

Open Task Manager
Click on the Details Tab
Right-click on SearchUI.exe and select End Task

Dump AD Information

I needed to grab all information about our current asset lists and our KACE tool was not to be believed in terms of inventory (HR said we have 500 employees, O365 said we have 615, and Kace said 322 devices).

Load up powershell on a domain controller Get-ADComputer -Filter * -Property * | Select-Object Name,OperatingSystem,OperatingSystemServicePack,OperatingSystemVersion,LastLogonDate | Export-CSV c:\logs\AllWindowsDump.csv -NoTypeInformation -Encoding UTF8

From there I could use Excel to massage the data and sort accordingly.

RDS Default Printers

We had an aging RDS 2012R2 farm that was in need of some upgrades; Installed RDS2016 and hoped it would fix a few issues. Overall it’s pretty good, but we made the mistake of not realizing the 2012 licenses were NOT under SA, so we had to reorder license CALs.

One of the major issues was when a user logged in and attempted to print, they would need to re-add their printer and set the defaults every time they logged in. A workaround would be to assign specific users to specific printers using GPO, but that gets a bit messy when we have users migrating between sites, locations, etc.

Open Regedit
Add the following REG_DWORD Value to HKEY_LOCAL_MACHINE\SOFTWARE\Microsoft\Windows NT\CurrentVersion\Print\Providers\Client Side Rendering Print Provider
RemovePrintersAtLogoff VALUE: 0

I rebooted afterwards and then verified it is working.

Show Sender’s Domain In Outlook View

While DKIM and SPF records have curbed some of the phishing attempts that “come from” my domain, there are still many times that users are confused as to why the CEO is emailing them wanting to change bank information or to buy hundreds of dollars of iTunes gift cards. I’m usually met with a “just block it” mentality. My best example is to say “Hello, my name is Bob Dole, pleasure to meet you”. They know I’m not actually Bob Dole, but that doesn’t prevent me from saying I’m Bob Dole. Then I show them my ID and tell them that’s similar to looking at the technical mail headers to figure out who sent this message (more importantly where it came from). And yes, before anyone asks, my ID is different from “Bob Dole”.

That being said, we created a rule for certain executives to prevent someone from doing something stupid (generally with money involved). All of our Executives, HR, and the Payroll team have a rule setup that when a sender shares the same name as one of those team members, AND is an external sender, I pre-append the message “*** THIS MESSAGE MAY BE PHISHING AS IT ORIGINATES FROM OUTSIDE THIS ORGANIZATION***”. I thought that would be enough, but we are still getting tickets asking if those messages are legit.

So now onto the actual meat of the post – to show the sender’s domain name in our standard outlook view. I wish it were as simple as choosing this in the field chooser, but alas…

*Note* this is on a per-folder view – not mailbox specific – and does not affect mobile or OWA access views. This also assumes you’re on Office2010 or later (I’m on 2016 FYI).

Open the mail folder you want to view sender domains (in my case it’s the Inbox).

Click on View, then on the Add Columns button

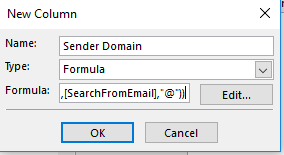
Now click on the New Column… button

Name: Sender Domain
Type: Formula
Click on the Edit button
Enter this text: right([SearchFromEmail],len([SearchFromEmail])-InStr(1,[SearchFromEmail],”@”))
Click OK

Now we should be back in the Show Columns/Field dialog where you can select your newly created column and move it “up” to where you want it to show. I end up showing it between Attachment and From fields.

Click to Run Office, Install Visio

I needed to install Visio on my laptop. Laptop, running Win10 Pro 1709, already had Office 365’s office version installed.
Visio was part of our VLSC/Business Center downloads. I noticed I had MAK keys and C2R-P MAK keys for the ODT.
I tried to just install from the downloaded ISO but it said something about 32/64bit product conflicts. I fixed that (https://answers.microsoft.com/en-us/msoffice/forum/msoffice_install-mso_win10/office-16-click-to-run-extensibility-component-64/e79ee5bd-f119-4808-9bb2-289dd815b76a) but then had it error out with something like “this product doesn’t work well with the click to run installed programs”.

Download the Visio ISO (or replace visio with another product)
Download the Office Deployment Tool. “Install” this by double clicking (it just extracts to a you-get-to-choose working folder).
Comes with 2 files; setup.exe and configuration.xml

Edit the xml file
<Configuration> <Add OfficeClientEdition=”64″ > <Product ID=”VisioProXVolume” PIDKEY=”69WXN-MBYV6-22PQG-3WGHK-RM6XC”> <Language ID=”en-us” /> </Product> </Add> </Configuration>
Save

Open a command prompt (or shift + right-click open powershell in this window) and navigate to wher your xml and exe files are.

Download the required setup files
setup.exe /download configuration.xml

Install the setup files
setup.exe /configure configuration.xml

Visio is now installed!

https://docs.microsoft.com/en-us/deployoffice/use-the-office-deployment-tool-to-install-volume-licensed-editions-of-visio-2016
https://docs.microsoft.com/en-us/deployoffice/overview-of-the-office-2016-deployment-tool